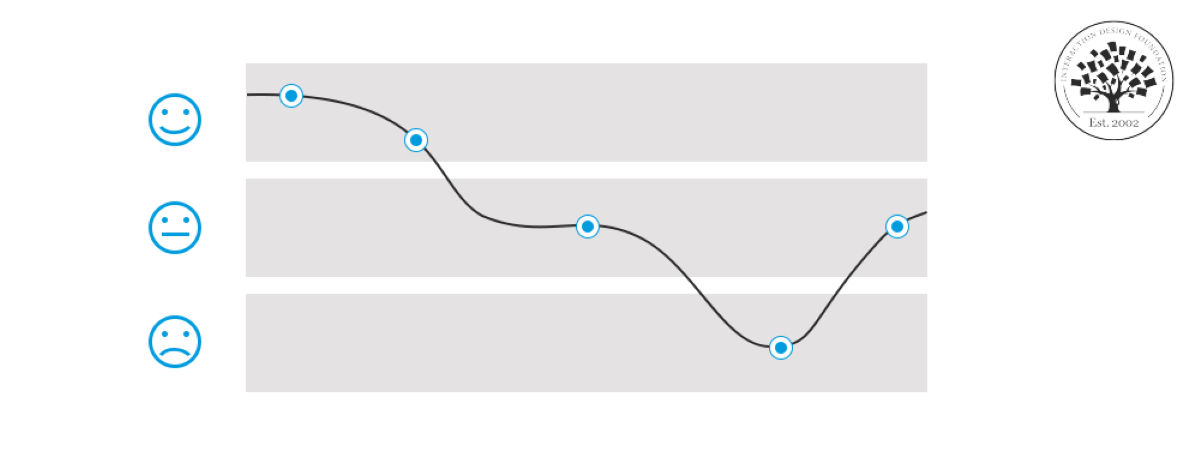
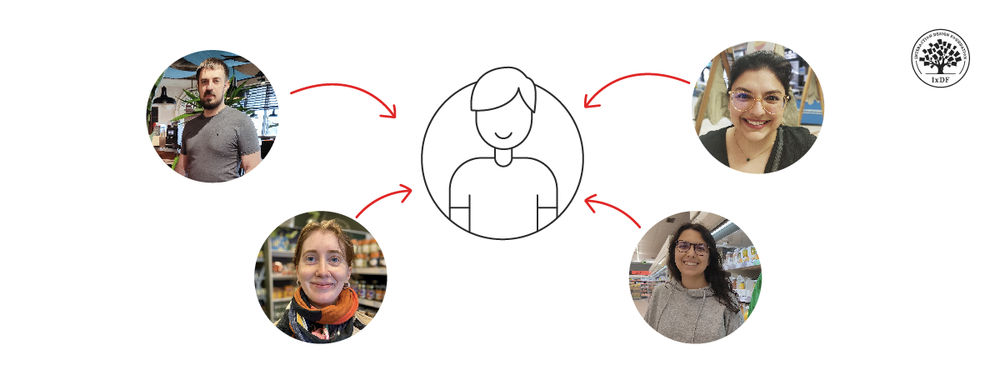
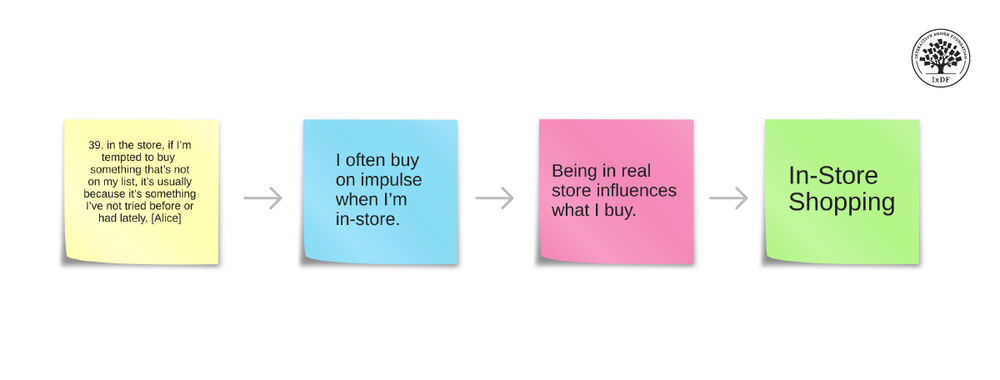
A low conversion rate (below 2%) usually means a website struggles to keep visitors interested. Journey mapping helps identify why visitors leave quickly and tracks every step of a user's interaction with a website. The goal is simple—to create a smooth, enjoyable journey to make users return. Learn the secrets of journey maps with the IxDF course, Journey mapping. This course shows you how to pinpoint user experience (UX) improvement areas effectively and how to enhance user satisfaction and loyalty—solid UX design fundamentals.
Have you ever found yourself lost on a website, unsure where to click next? Frustrating digital experiences make us want to give up and leave. That’s why journey mapping is important. It's a strategic approach in UX design that lays out a user's path through a product or service. When you understand each step a user takes, you can create more intuitive and enjoyable experiences. This understanding is vital to leverage alongside UX design principles to make better digital solutions and services that users—and customers—want.
In journey mapping, you plot a course to guide users from one point to another. This method reveals the pain points and moments of delight in a user's product interaction. When you smooth out these critical junctures, you can craft solutions that meet—and exceed—user expectations.
“Good design is obvious. Great design is transparent.”
— Joe Sparano
Journey mapping equips us with the insights needed to refine the user experience and create first encounters with your product—both positive and memorable ones. And, since 94% of first impressions relate to a website's design, it’s critical to make an excellent first impression through a well-mapped user journey. A solid understanding of journey mapping principles can transform a confusing or mediocre user experience into one that’s engaging and seamless.
To create seamless user journeys, you’ve got to understand the journey mapping process in detail. So, let’s look at the fundamental aspects you should explore to craft better digital experiences.
Table of contents
- Journey Mapping: The Essentials
- Journey Mapping Variations
- The Role of Research in Effective Journey Mapping
- How to Create Journey Map Variations
- The Role of a Journey Mapping Workshop (and How to Do It Right)
- About the Journey Mapping Course
- References and Where to Learn More
Journey Mapping: The Essentials
Journey mapping enables teams to visualize the user's experience from initial contact through various interactions to the final goal. Let’s run through the basics.
What is Journey Mapping?
Journey mapping creates a detailed visualization of a user's experience with a product or service. It maps out each step a user takes. A journey map is a visual representation that highlights their feelings, motivations and challenges. For any number of target audiences, these are vital points for designers and design team members to know in their design process. To be sure, customer centricity and a user’s point of view are core parts of UX design, including user-centered design, human-centered design, product design and service design. This process helps you identify pain points and opportunities to enhance the user experience for potential customers and users as they move through a user experience flow to achieve a goal.
Watch Matt Snyder, Head of Product & Design at Hivewire, discuss journey mapping in UX.
Why Journey Mapping Matters
Journey mapping matters because it shows where users face struggles and frustrations. If you understand these issues, you can make your websites or services better. What that translates to is happier customers who are more likely to return and recommend the product/service to others.
Let’s think about the process users follow to book a flight online. The user's journey begins with their search for flights—and it’s here where they might encounter their first obstacle: a confusing interface. This moment could lead to frustration. It may push them towards a competitor's website. Journey mapping would reveal this pain point and allow you to simplify the search process before usability testing and long before any users have interacted with your brand’s ultimately released product.
Next, the user selects a flight. If the site bombards them with too many upsell options—like seat upgrades or extra baggage—it might overwhelm them. A well-designed journey map would highlight this issue. It may suggest a more streamlined and helpful upsell process—not a pushy one by any means.
Finally, the user reaches the payment section. If there’s a complex checkout process with unclear pricing and surprise charges, it can deter them from completing the purchase. Journey mapping pinpoints this critical moment. You may have to recommend a clearer, more concise checkout flow.
If you map out this journey, your design team can:
Simplify the flight search interface to reduce initial frustration.
Streamline the upsell process to enhance the user experience without overwhelming them.
Revise the checkout process for clarity and ease. You must encourage the completion of the purchase.
Watch this quick video that explains the power of mapping.
How Journey Mapping Improves UX
Journey mapping provides a clear framework to analyze and optimize each touchpoint in the user's journey. It allows you to:
Identify and eliminate barriers that cause frustration or abandonment.
Enhance features that users find valuable through the principles of UX design and more.
Design with a holistic understanding of the user's experience.
Journey Mapping Variations
Journey mapping comes in different forms—and each one offers unique insights into the user experience. These variations can help you apply the right approach to your UX challenges. You’ll learn about these variations in detail in our journey mapping course.
Experience Maps
Experience maps are the broadest form of journey maps. They map out the overall human experience in different situations. You can use these maps for more than product or service interactions. The goal with them is to get a broad understanding of human behaviors and feelings.
For example, let’s consider mapping the common experience of commuting. This could include various methods like walking or biking to public transport. Experience maps can help you spot common issues and chances for improvement. They prepare you for more detailed studies.
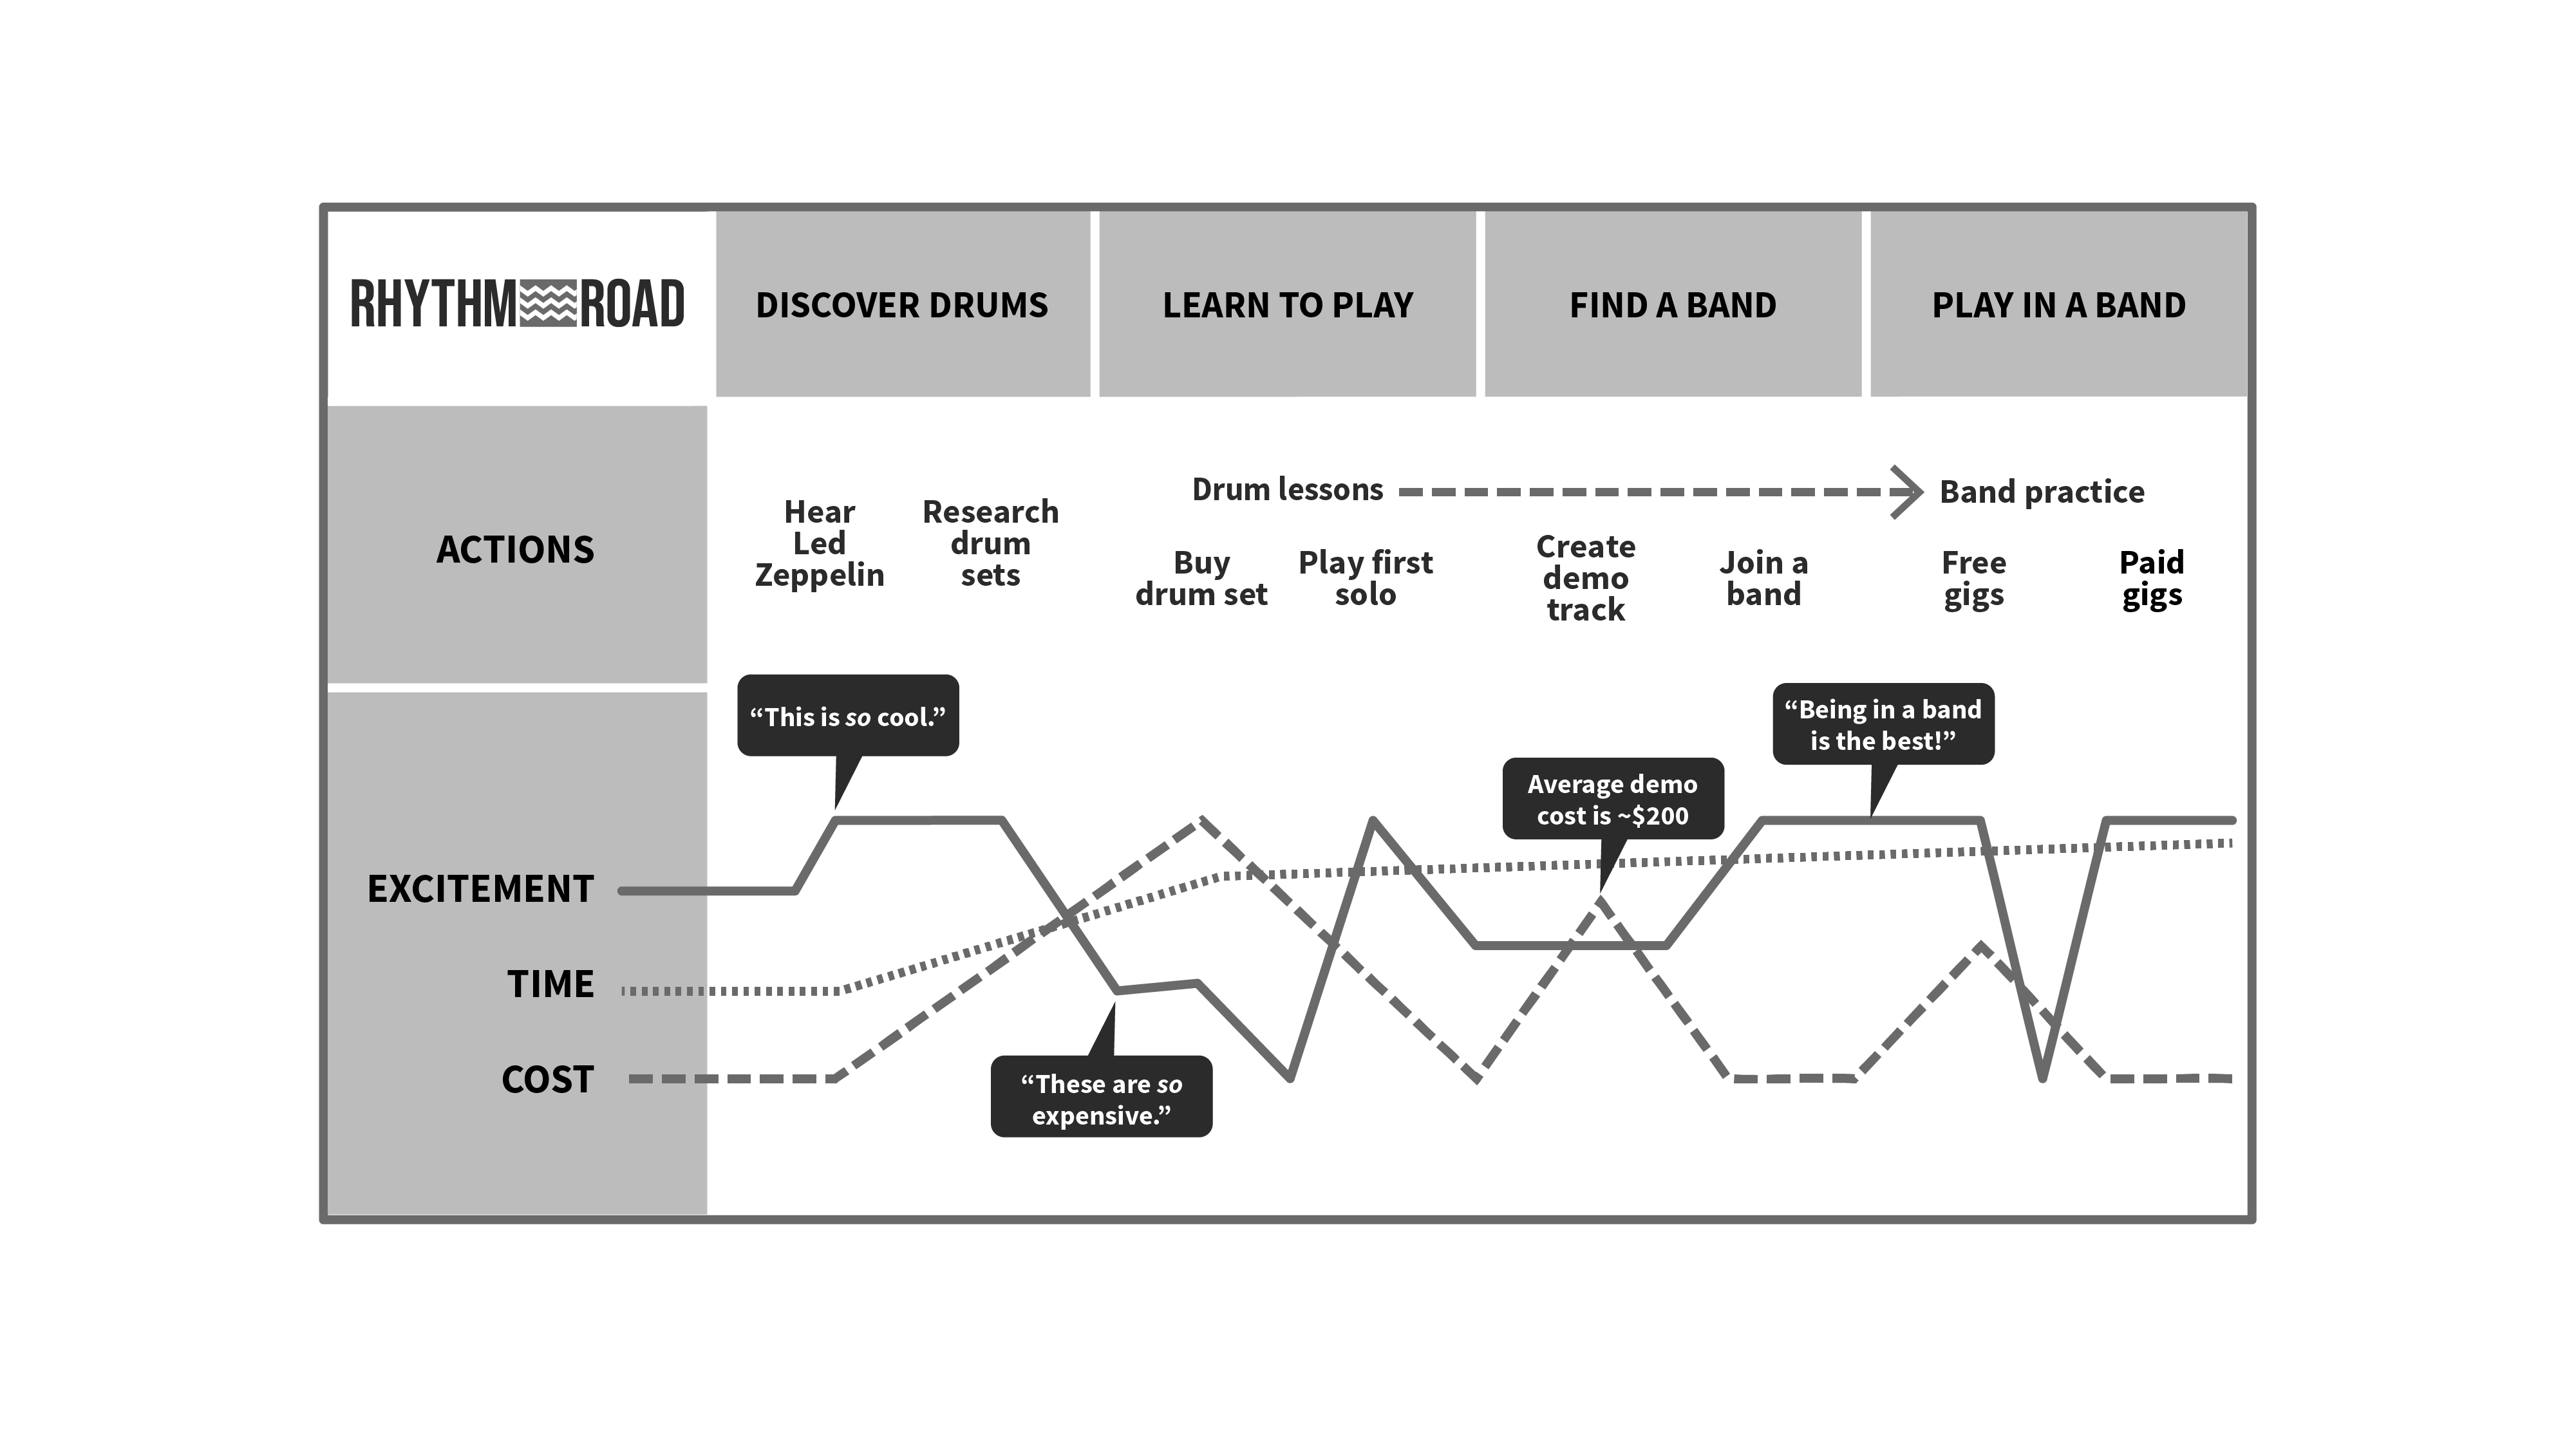
Example of an experience map for learning to play the drums and go forward with that talent.
© Interaction Design Foundation, CC BY-SA 4.0
Customer Journey Maps
Customer journey maps narrow the focus. They focus on how a person interacts with a specific product or service. These maps help us understand a customer's experience with a business.
A customer journey map includes the following elements.
Customer persona: This defines a typical customer. You create a character that represents a part of your customer base.
Phases: Stages of the customer journey. It typically includes Awareness, Research, Consideration, Purchase and Support.
Touchpoints: These are all interaction points between the customer and your brand across different phases. This interaction may happen through marketing materials, digital presence, staff interactions, purchase process and post-purchase follow-up.
Customer thoughts, actions and emotions: Detail what customers think, do and feel at each touchpoint. Use surveys and direct feedback for accuracy.
Opportunities: You list the chances to improve the customer's experience, solve any issues they face and make their journey smoother.
For instance, with a music streaming app like Spotify, a customer journey map would show how a user finds, chooses and uses the app. It would point out their main steps and where they might have problems.
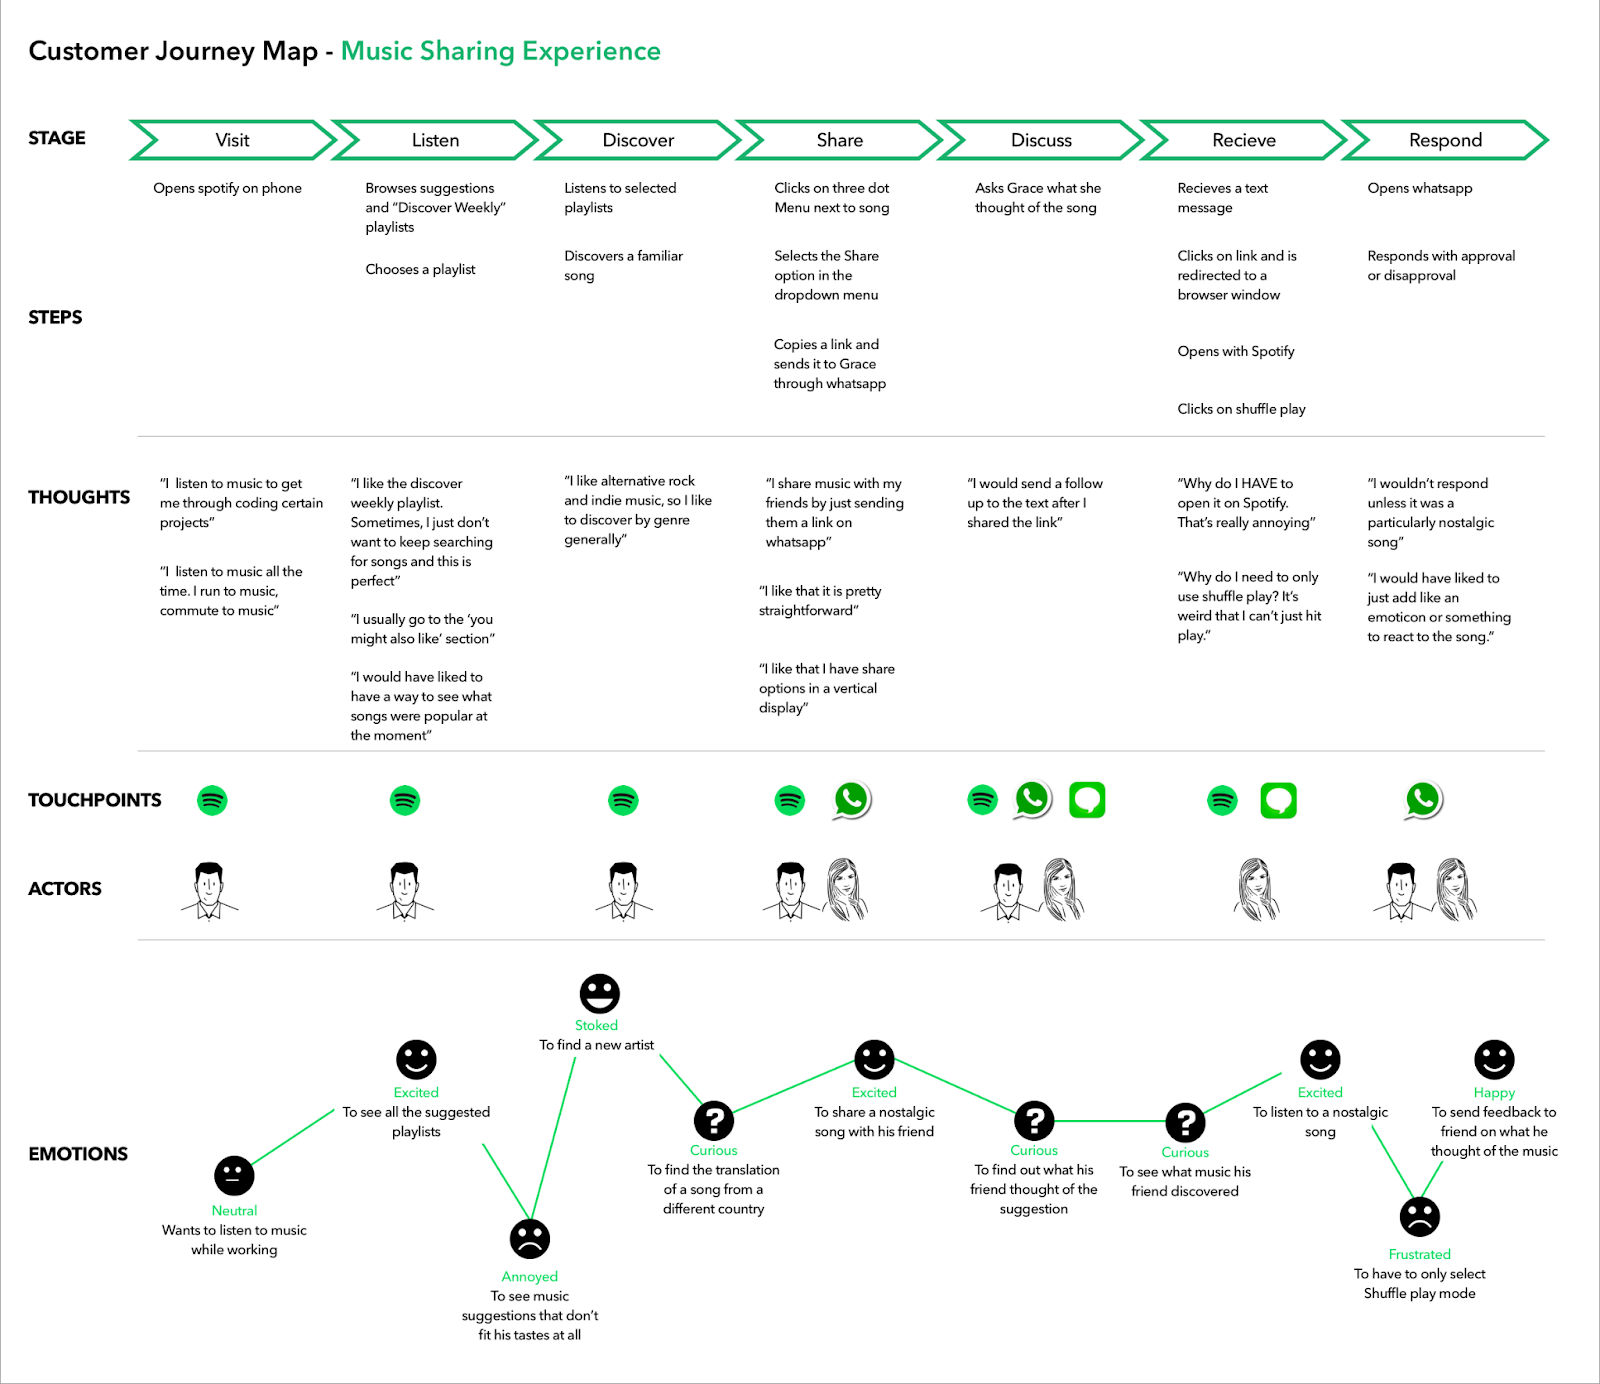
An example of a customer journey map for a music streaming app. It tracks interactions from the initial visit to the response. It also highlights emotions and thoughts at each stage.
© Draft.io, Fair Use
Service Blueprints
Service blueprints build on what we learn from customer journey maps. Unlike journey maps—which focus on the customer's experience—service blueprints give us a peek into how the service works behind the scenes. They show how different parts of the service work together to support the customer's journey.
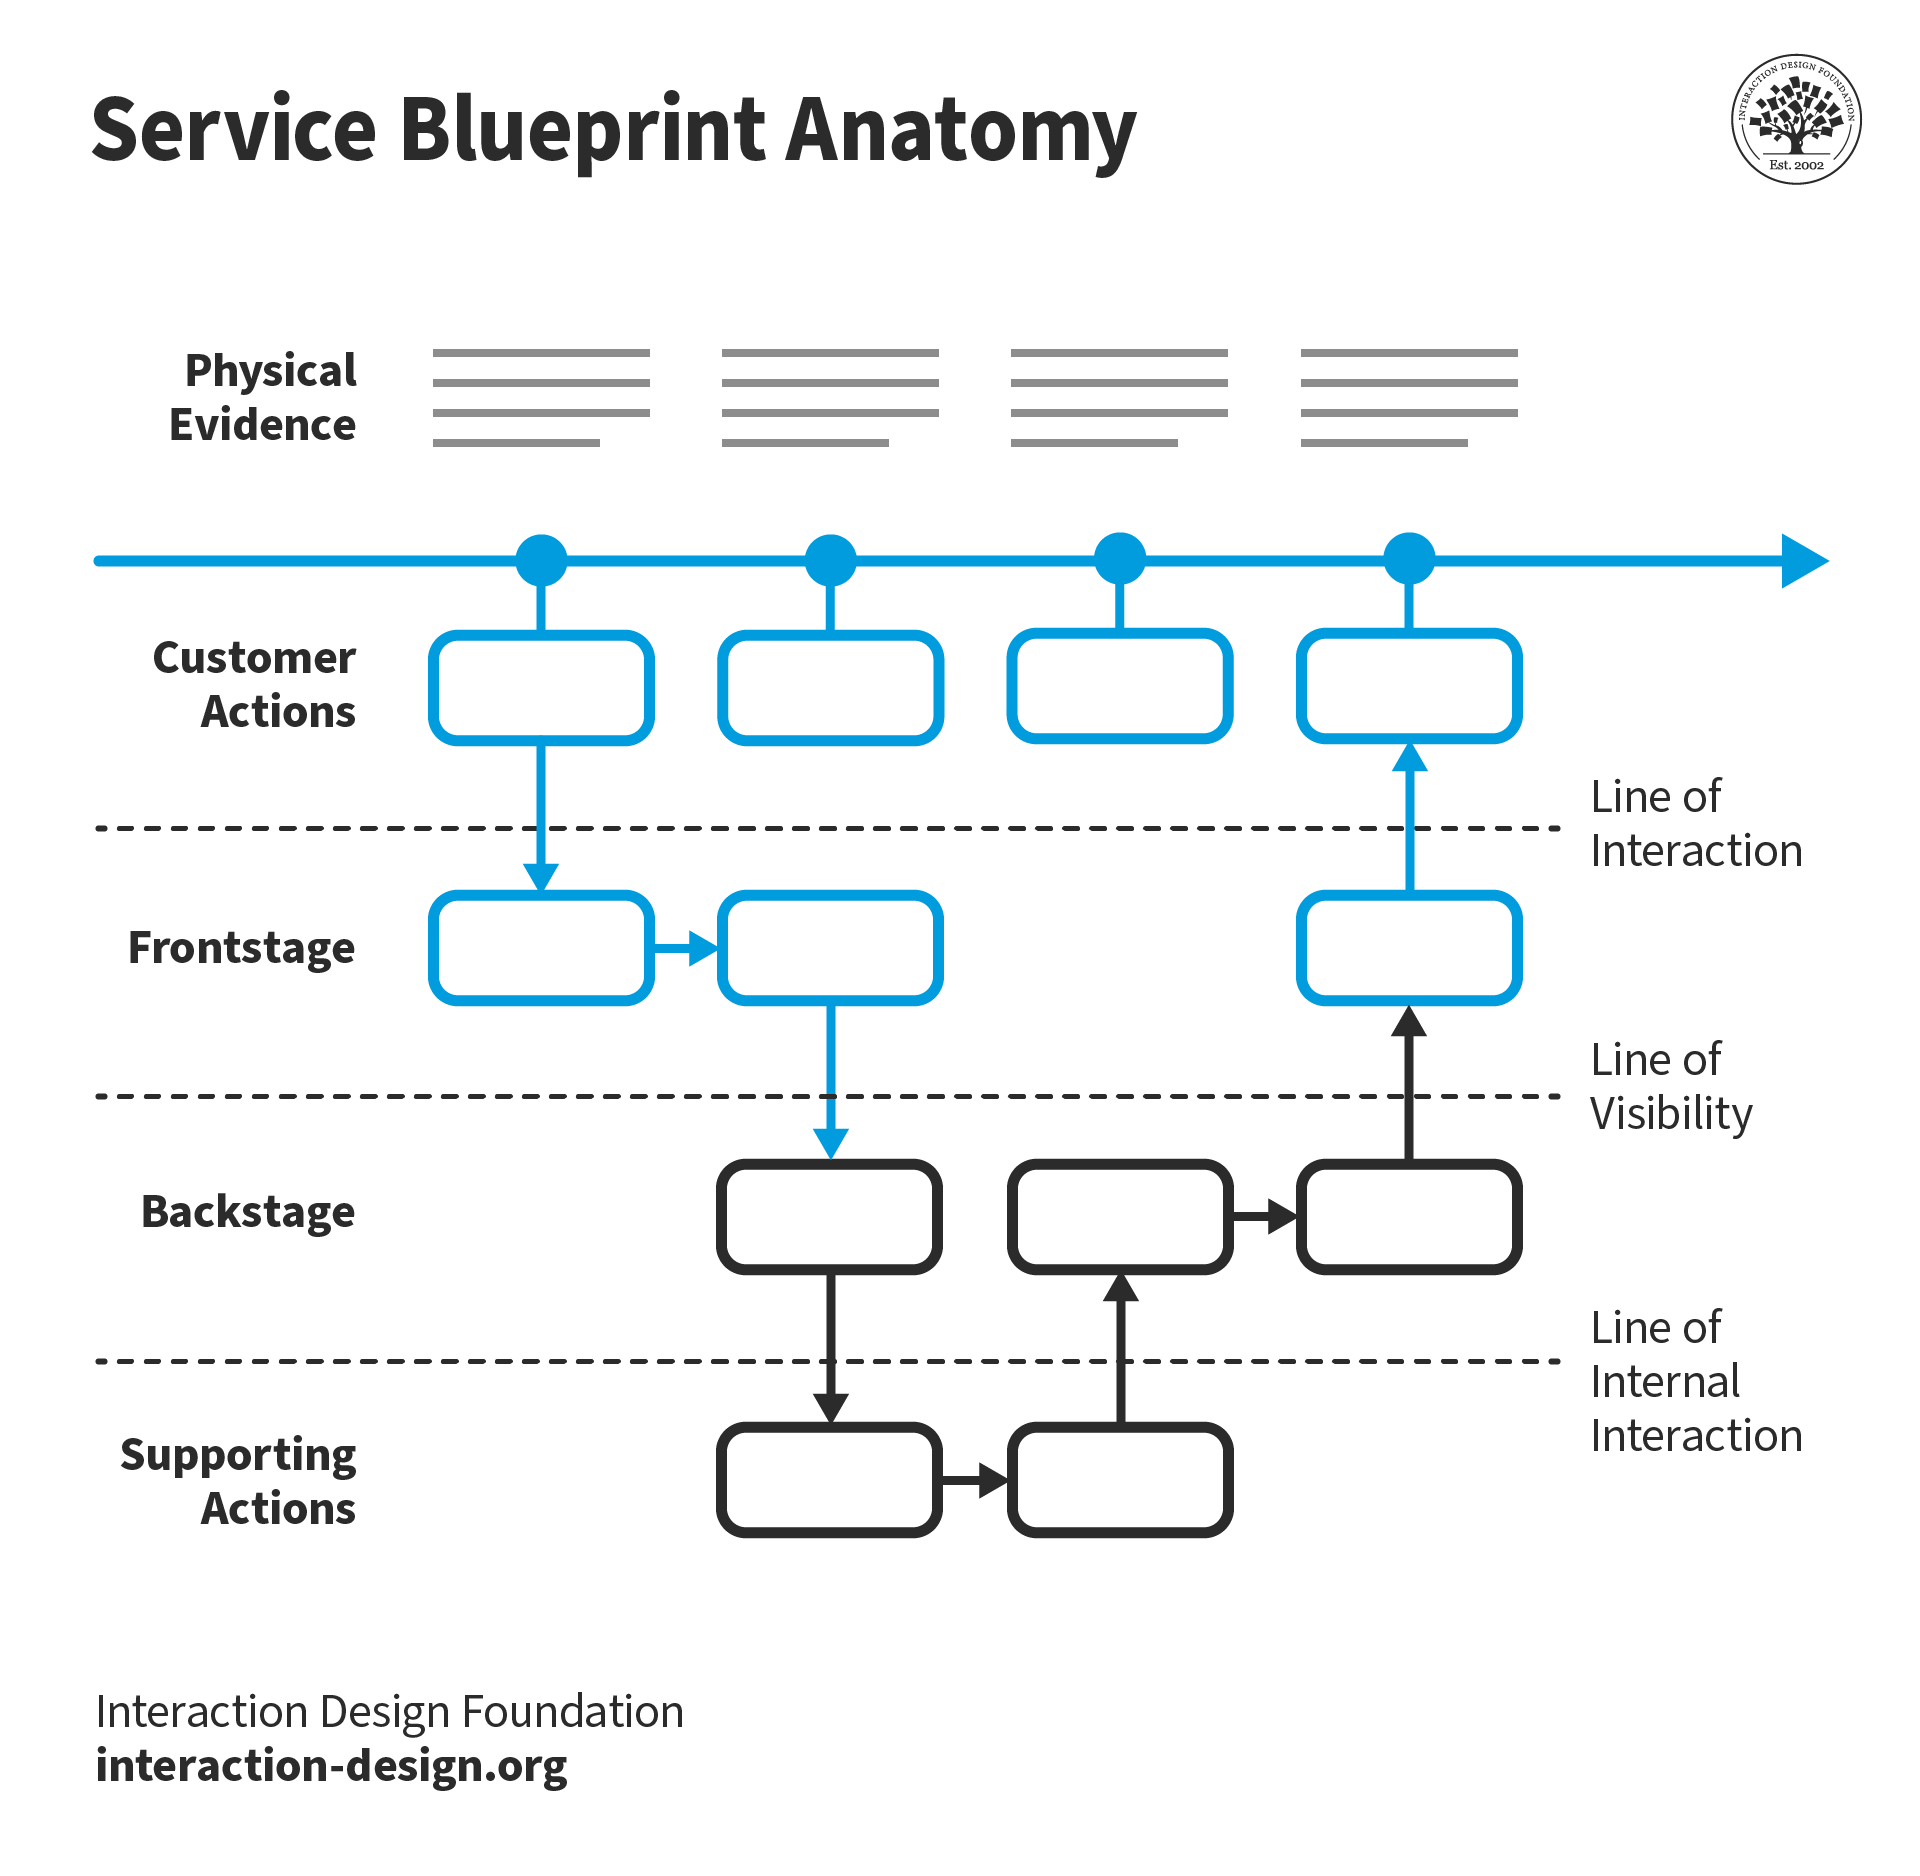
The anatomy of a service blueprint showing all the key processes in different phases. (described below)
© Interaction Design Foundation, CC BY-SA 4.0
A service blueprint maps out five key areas:
Physical evidence: This is anything the customer can see, touch or interact with—like a website or a product. It includes all the physical parts of the service.
Customer's actions: These are the steps customers take when they use the service. The service needs these actions if it’s to meet the customer's needs.
Frontstage: This area is all about what the customer interacts with directly. It's the part of the service the customer sees and uses.
Backstage: These are the parts of the service that happen out of the customer's view. They support the frontstage but remain hidden to the customer.
Supporting actions: These are the behind-the-scenes processes that make sure the service operates smoothly.
The Role of Research in Effective Journey Mapping
You need comprehensive data—both qualitative and quantitative—to create an accurate and useful journey map. This process involves understanding the problems your users face and the potential solutions—especially the ones they’d find optimal. Indeed, user or UX research is vital to bring on board. Here’s an overview of key steps to collect the necessary information.
Research Problems and Solutions
Identify the problems and opportunities within the user experience. You must look at the issue from two angles: the problem space and the solution space.
In the problem space, you aim to understand the user's challenges, needs and pain points. You typically do this through qualitative user research, such as user observation and interviews. Quantitative methods like surveys can also contribute. You don’t need to consider the existing solutions.
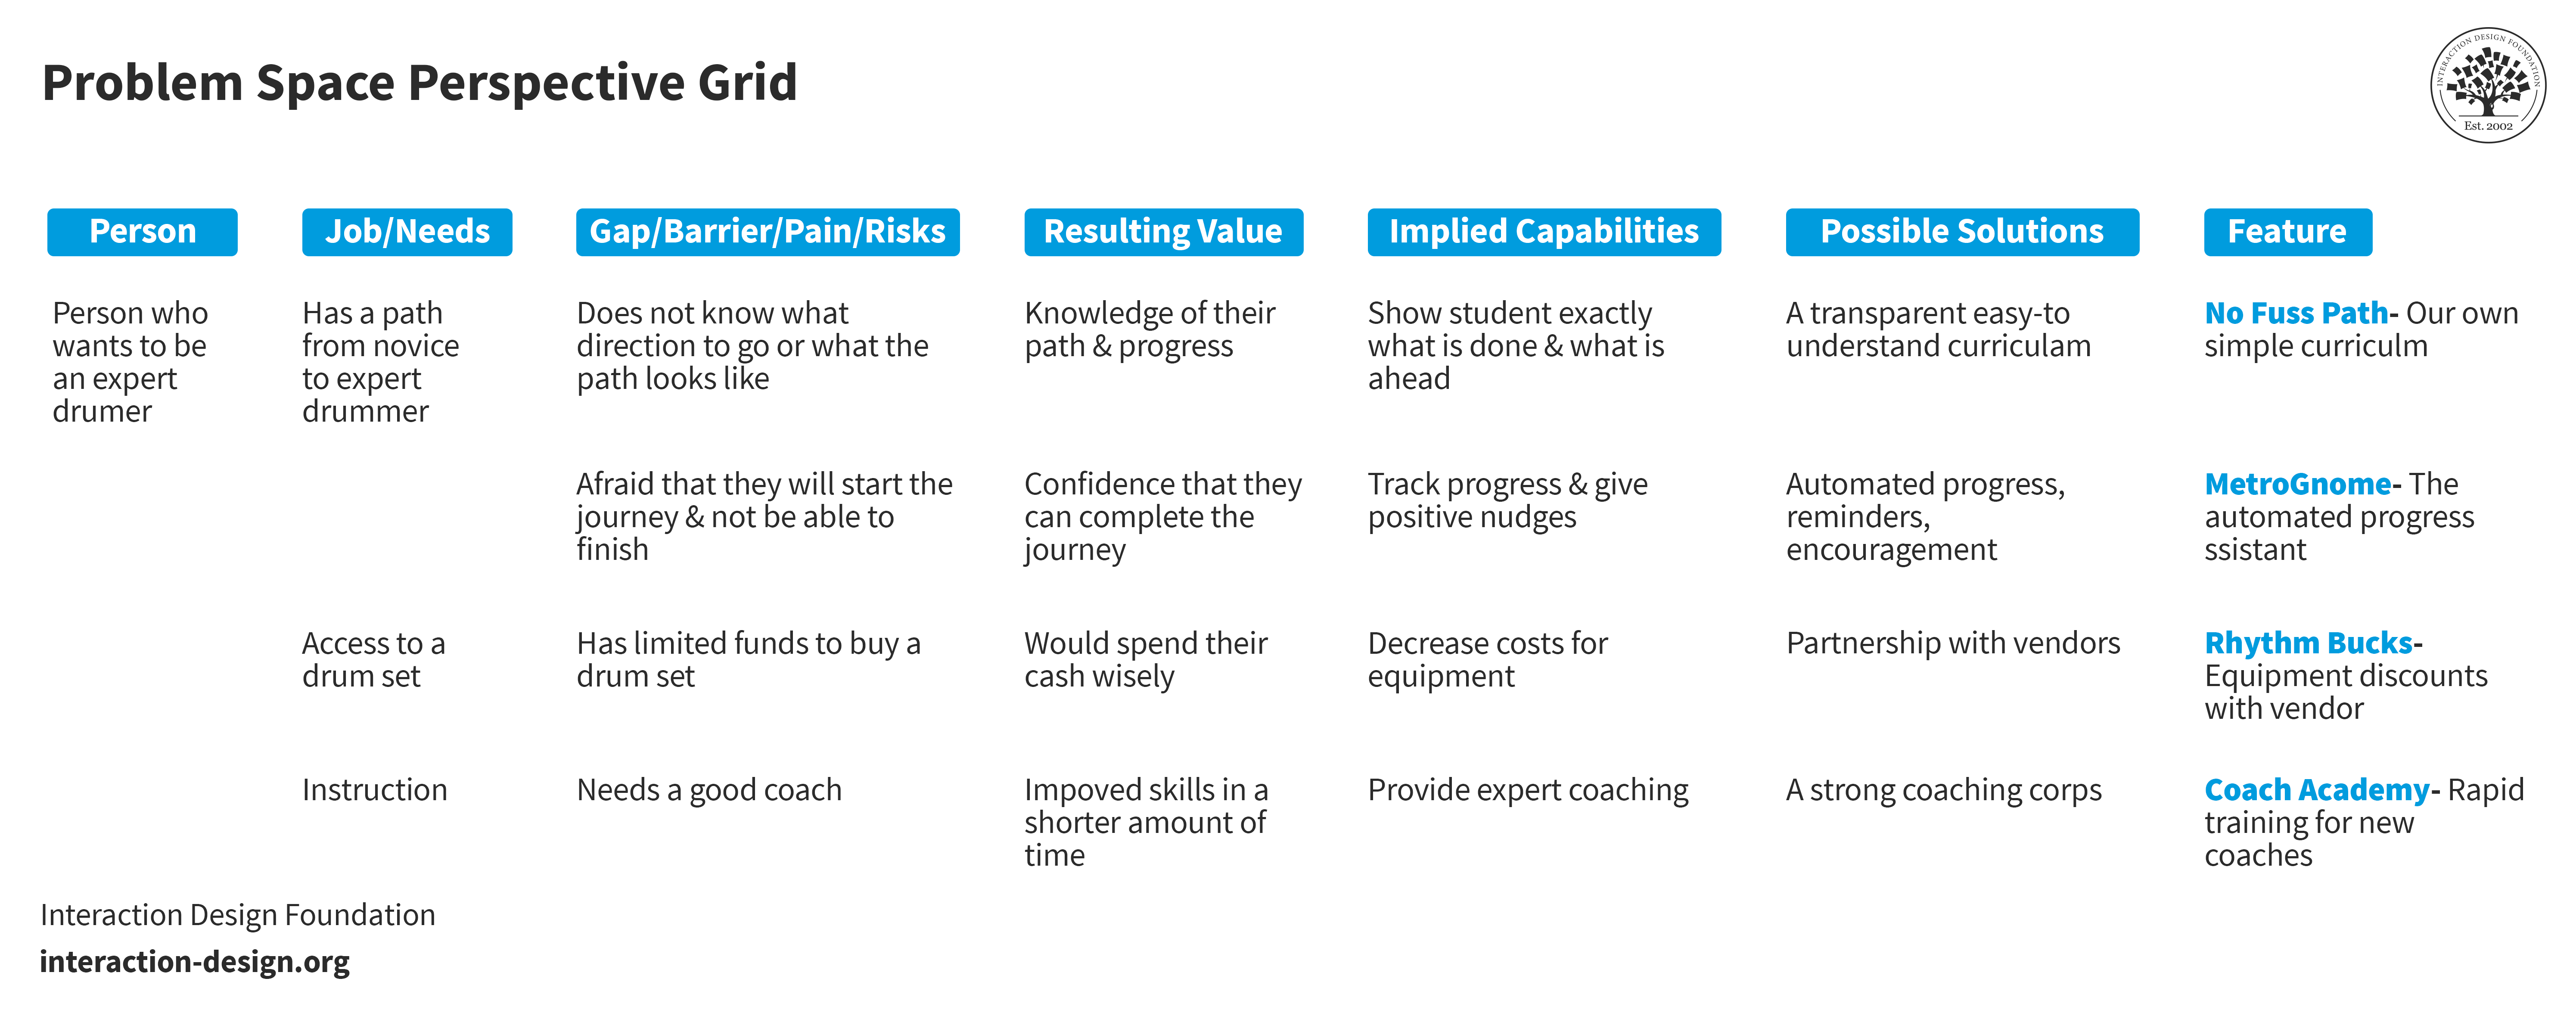
A straightforward perspective grid for a person aiming to become an expert drummer. This individual needs a clear path, access to drums and some instruction.
© Interaction Design Foundation, CC BY-SA 4.0
In the solution space, you ideate potential solutions to problems you identified. This shift requires a creative approach. You aim to explore various ideas that effectively address users’ needs and evaluate those in usability sessions or A/B testing.
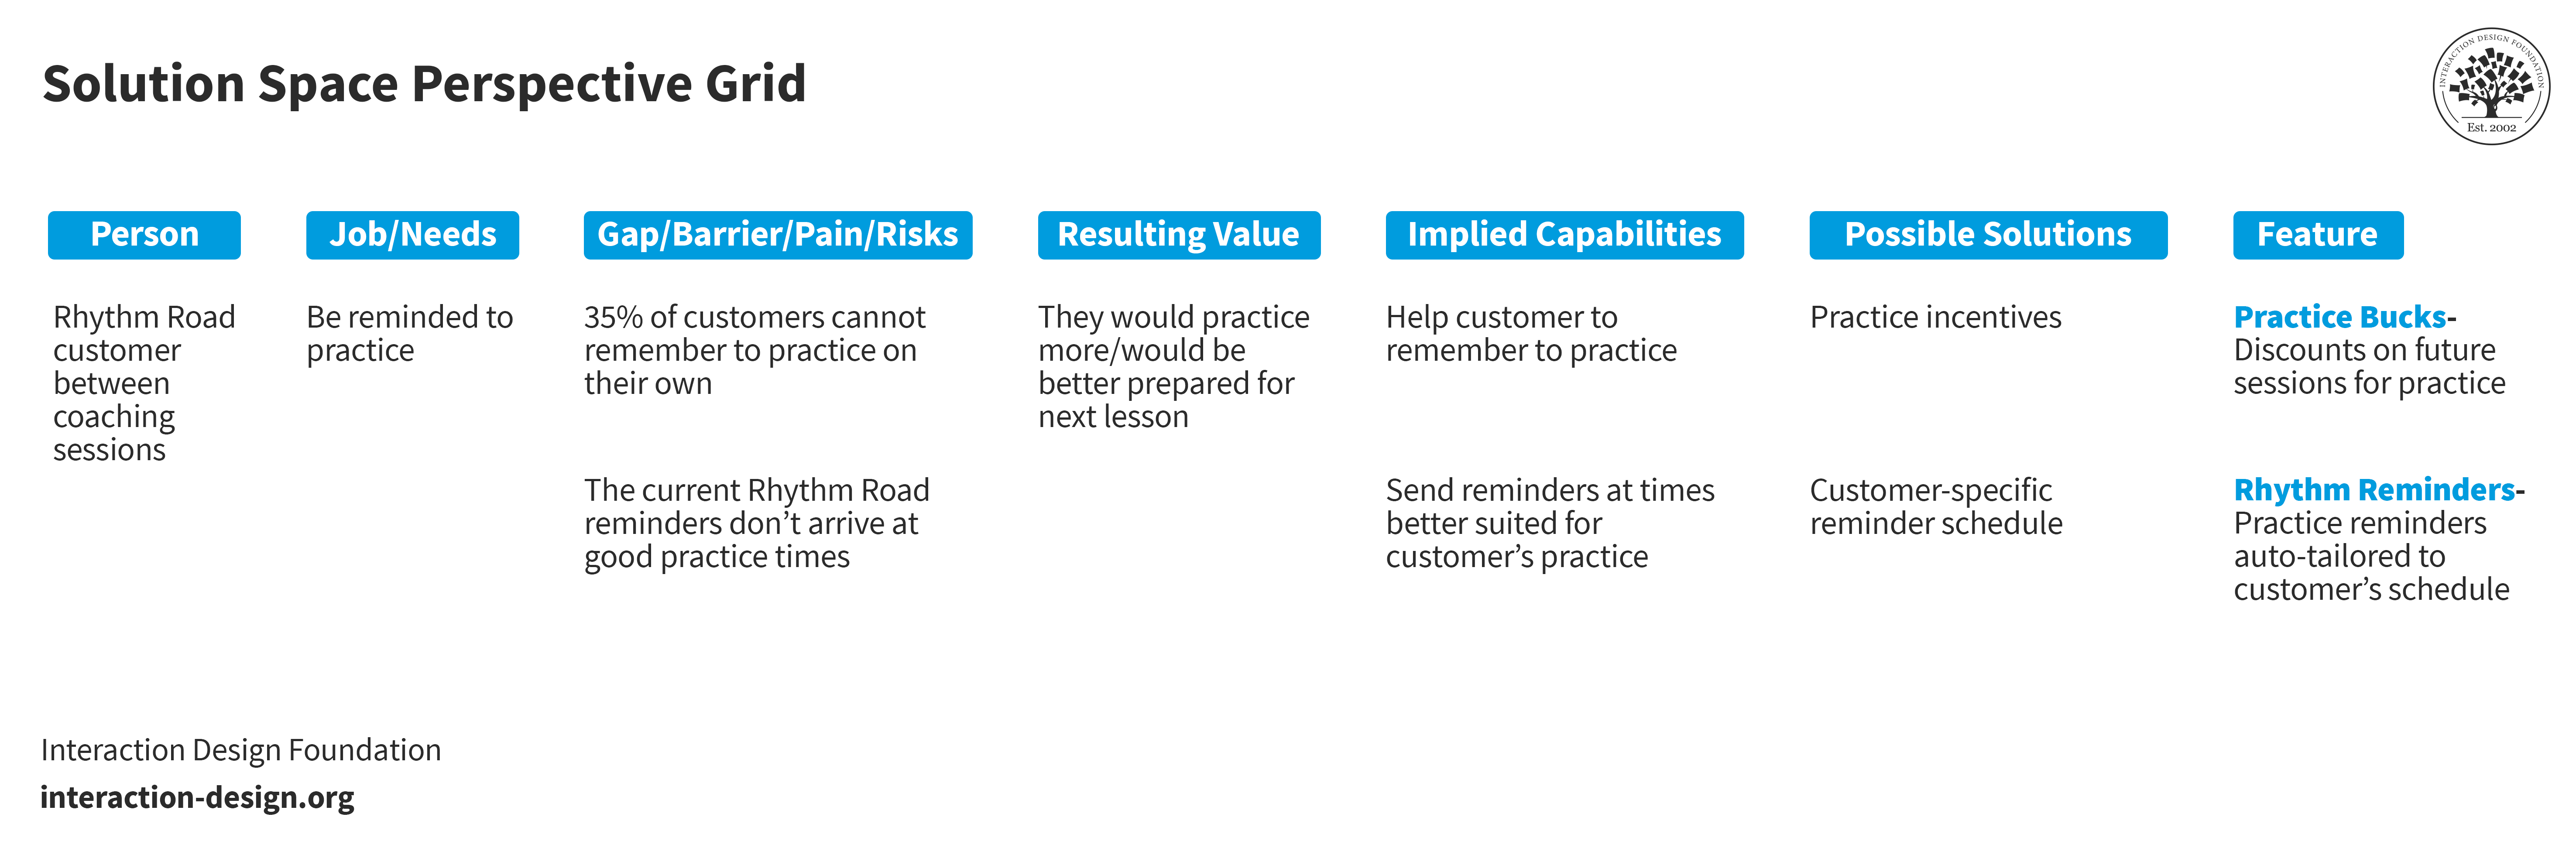
A simple perspective grid for a Rhythm Road customer. This customer is between coaching sessions. They need help from Rhythm Road to remember to practice.
© Interaction Design Foundation, CC BY-SA 4.0
Organize Your Research
A perspective grid helps you organize and synthesize the data collected from your research. You can use it to ensure the remainder of the journey mapping process proceeds smoothly. It allows you to categorize insights based on different user perspectives or personas. This step helps you understand the experiences and expectations of your user base.
To create a perspective grid, list your user personas along one axis and the stages of their journey along the other. Fill in each cell with the Gaps/Barriers/Pain/Risks relevant to that persona at each stage. This visualization helps you identify commonalities and differences across the journey.
How to Create Journey Map Variations
Each journey map variation helps you achieve specific goals. Let's explore how to create experience maps, customer journey maps and service design blueprints.
How to Create an Experience Map
An Experience Map involves a five-step approach.
Plan your experience map: Determine the scope. Decide who needs to participate in the workshop. Consider a cross-disciplinary team for better insights.
Customer research: Gather factual data along with user stories and analytics. This step helps you fill knowledge gaps.
Run the workshop: It’s an all-day event where diverse voices collaborate. You’ve got to plan the event for productive outcomes.
Create your experience map: Turn the workshop findings into a visual map. This map should outline general common experiences related to your field.
Use your experience map: Apply what you learned to make decisions and improvements in your organization.
How to Create a Customer Journey Map
Follow these seven steps to map out the detailed interactions users have with your organization:
Define your objectives: Determine what you aim to achieve with the map.
Gather information: Understand your customers’ behaviors, needs and how they interact with your product.
Identify customer touchpoints: Note how customers interact with your product. Then, understand how these touchpoints affect their experience.
Outline key stages of customer experience: From the customer's perspective, map the sequence of events. Document all events from initial contact to post-purchase support.
Start mapping: Use diagrams or digital tools to visualize the journey—and it’s best to include touchpoints, emotional responses and any other relevant factors.
Validate your results: Get feedback from customers and internal teams to make sure things are accurate.
Analyze your map: Compare it against your goals to see if it meets customer expectations.
How to Create a Service Design Blueprint
Service design focuses on the internal workings of a service. It outlines frontstage and backstage actions. Here’s how to develop a Service Design Blueprint:
Find support: Assemble a cross-disciplinary team and secure stakeholder buy-in.
Define the goal: Set a clear scope and business objective for the blueprint.
Conduct research: Unlike customer journey mapping, a blueprint requires more internal research. It includes direct observations and employee interviews.
Map the blueprint: Organize a workshop to determine the five elements encountered throughout the service delivery.
Refine and distribute: Enhance the blueprint with contextual details. Then, it’s time to distribute it to stakeholders to communicate the internal processes.
The Role of a Journey Mapping Workshop (and How to Do It Right)
The effectiveness of journey mapping hinges on a detailed and well-organized journey mapping workshop. This is when teams work together to understand and improve customer experiences.
Here’s how to navigate the pre-workshop preparation and conduct the workshop.
Before the Journey-Mapping Workshop
Preparation is key. Assemble a diverse team to bring a wide range of views. Prioritize the customer personas and scenarios you'll focus on to maintain a clear focus. Share existing research with all participants to get everyone on the same page. They should understand the journey's context.
Build a Collaborative Team
Journey mapping thrives on collaboration. So, it’s vital to include people from various departments to make sure there’s a holistic view of the customer journey in place. Don’t forget to invite stakeholders who’ll decide on the final approach. This team will help you create the map and implement its findings.
Prioritize Actors and Scenarios
Focus on specific customer personas and how they interact with your service. It helps you create a more targeted and actionable journey map. If you cover multiple personas or scenarios, plan how to manage this complexity.
Share and Analyze Existing Research
Compile and review all data related to the journey. This may include user experience studies, marketing analysis and customer feedback. Share information before the workshop to help everyone understand the starting point.
Assign Pre-Workshop Tasks
Assign homework to make the participants well-prepared—and this includes background reading and key questions related to the journey. This pre-engagement is something that makes the workshop more effective.
During the Journey-Mapping Workshop
The workshop should be an active and engaging process. It starts with building a basic understanding. Then, you map the customer's experience and brainstorm ways to improve it. Brainstorming is a great way—and integral to the design thinking process—to access ideas that otherwise mightn’t become apparent.
Establish the Foundation
You bring everyone on the same page to begin. Everyone should understand journey mapping principles, existing research and input methods. Use engaging activities like trivia to refresh key concepts and energize the group.
Map the Current State
The team would create an assumption-based map of the current journey. This should reflect the team’s collective understanding. It’s a vital point to offer attendees a template to identify pain points with ease:
" requires ______ to achieve ______."
" requires ______, allowing them to ______."
For instance: "Bob requires an easier method to compare choices, allowing him to avoid feeling swamped."
Note: It’s important to avoid using the first person, like "As a I want...". This format can be repetitive and time-consuming in documents that are full of user stories. It shifts important information into sentences that make them harder to scan and understand, too. More importantly, you must not assume the user's perspective as that can lead developers to project their own experiences and biases onto users.
Make the map open to revisions. Use customer interviews for this phase to validate assumptions and gain fresh insights.
Vision the Future State
Use the identified pain points to brainstorm ideas to improve the customer journey. Encourage teams to think big and use metaphors in their ideas. This prevents them from focusing too early on specific solutions—like features. Sketch and critique potential future interactions to translate these ideas into tangible designs.
You need the positive aspects on green sticky notes. You can mark areas for improvement on yellow ones. The critiques help refine the ideas.
Now, it’s time to merge the best elements from these individual sketches into a unified future-state flow. You can then share this consolidated journey with the whole workshop team. It will help you paint a picture of what the improved customer experience could look like.
After the Journey-Mapping Workshop
The work doesn’t end when the workshop does. Quickly share the outcomes and next steps to maintain momentum. Further test and refine the ideas generated during the workshop. It’s something that will bring meaningful changes to the customer journey.
Share Workshop Insights
Now, it’s important to document and distribute the workshop's findings to all participants and stakeholders. This includes:
The journey maps created
Identified pain points
Future state designs
Keep everyone informed for continued engagement and support in implementing changes.
Bring Ideas to Life
Translate the workshop's conceptual ideas into prototypes for user testing. This iterative design and feedback process is something that helps refine the solutions into actionable improvements to the customer journey.
Continuously Refine the Process
With each workshop, it’s vital to collect feedback on what worked—and what didn’t—to improve future sessions. This continuous improvement ensures that journey mapping remains a productive and insightful tool for your organization.
This might seem like a lot, but if you want to learn about how to set up workshops, the journey mapping course can help you. You’ll learn how to do all of these:
Increase understanding
Create visions
Guide evaluations
Plan experiments
Build a workshop plan
About the Journey Mapping Course
Journey mapping is a 7-week course that will help you solve complex design problems with simple, user-friendly solutions. You’ll learn the right journey-mapping process for your goals and master data collection and analysis with a perspective grid. Create key journey maps: experience maps, customer journey maps and service blueprints. Gain skills to run a journey mapping workshop and turn insights into real solutions.
This course will help you if you want to design smooth shopping experiences, easy signup flows or engaging apps. Start with journey mapping basics. Understand its power and role in UX design. Learn to identify, read and use various journey maps. Gain data gathering and analysis skills. Then, finish with the ability to create journey maps and lead workshops.
Make sure to benefit from practical techniques and downloadable templates, such as the Customer Journey Map template. Participate in three hands-on exercises in the "Build Your Portfolio: Journey Mapping Project." These activities solidify your learning. They also offer an option to create a case study for your portfolio.
Learn from four industry experts:
Indi Young, founder of Adaptive Path, brings her deep understanding of data gathering in journey mapping. She wrote two books, Practical Empathy and Mental Models.
Kai Wang shares insights from his experiences at CarMax and CapitalOne. She emphasizes journey mapping's organizational impact.
Head of Product & Design at Hivewire, Matt Snyder, presents journey mapping as an effective product development tool. He teaches the application of a perspective grid for smoother data-rich processes.
Christian Briggs, Senior Product Designer and Design Educator, guides you through this course with his extensive experience in digital product design and journey mapping.
This course caters to budding and intermediate designers eager to refine complex user experiences. It's ideal for:
Aspiring UX/UI designers seeking foundational design skills.
Junior to mid-level designers aiming for advanced challenges and strategic team roles.
Product managers focused on crafting intricate experiences.
Join a global design community that shares knowledge. Collaborate, learn and grow with peers to enhance your design skills and career prospects.
Course Overview
Weekly lessons: We release each week with no deadlines.
Learning time: Approximately 9 hours and 54 minutes over the span of 7 weeks.
References and Where to Learn More
Enrollment for the Journey Mapping course is now open. It’s included in an IxDF membership.
To become a member, sign up here.
Read our article Customer Journey Maps — Walking a Mile in Your Customer’s Shoes.
Learn more about website conversion rates.
