Your constantly-updated definition of High-Fidelity Prototypes and
collection of videos and articles. Be a conversation starter: Share this page and inspire others!
264shares
What are High-Fidelity Prototypes?
High-fidelity prototypes are highly detailed, interactive representationsof a product thatclosely resemble their final design. They are often created with design software and provide a realistic preview of the user experience and visual aesthetics of a product. High-fidelity prototypes are used for user testing, stakeholder approval and developer handoffs.
In this video, Professor and Expert in Human-Computer Interaction Alan Dix explains why prototypes are essential to designing successful user-centered products.
ShowHide
video transcript
00:00:00 --> 00:00:30
Well, as we know, we're doing interaction design. We typically have cycles of interaction where we design things, we prototype, we evaluate the prototype and then redesign when we understand the problems. So, you start with something and we iteratively make it better and better and better.
00:00:30 --> 00:01:01
We do this because we're never going to get it right first time because users are complicated and we're just not good enough as designers and probably never could be good enough to get things right first time. So, we always iterate. That's exactly the thing to do. Completely standard. If at first you don't succeed, try, try again. That's easy. We know this. I hope you've learned that lesson. You might have learned it from me, but you've probably learned it in your own experience and certainly elsewhere as well.
00:01:01 --> 00:01:32
That feels like that's the end of the story. Iterative design. Everybody does it. However, it's not the end of the story. If you just do that, it might work, but often you might actually get stuck in things which are not so good, after all. I'll explain why this is; and so, what I'm going to do is imagine instead of doing a design, I'm walking and trying to get to the highest possible point. So, what you want is the best possible design.
00:01:32 --> 00:02:02
I'm going to think about walking and trying to find the highest possible point. So I start walking, and you can look these up on Google Maps for yourself. But imagine I'm somewhere near the boundary between Wales and England, I'm slightly on the English side, but I'm near... There's a range of hills called the Malvern Hills. So let's assume I'm starting in Great Malvern, which is the village at the bottom of those. And I start walking upwards, and depending on exactly where I start
00:02:02 --> 00:02:33
– let's imagine I get the highest points of the Malvern Hills, and these hills sit in the middle of nowhere. So here's me and I'm starting at Great Malvern and I'm going uphill. I'm going uphill. And then I get to the top. The highest point in the Malvern Hills is a peak called Worcestershire Beacon. And it's just under 1,400 feet tall. That's 425 meters. So it just counts as a mountain by British standards. Anything over 1,000 feet is a mountain.
00:02:33 --> 00:03:03
Obviously not a tall mountain but it's a mountain. But it's the tallest place for miles around. You can look out and you can see – I think it's three counties meet there and you can see forever around. And you feel you're on the top of the world. And you are locally on the top of the world. But of course you're not. It's only 1,300 feet. If you'd started, of course, somewhere in the Alps
00:03:03 --> 00:03:32
and you started walking up and you'd walk up and you'd walk up and maybe you'd need your axe, your ice axe, to help you. You might have got to the top, instead, of the Matterhorn. And the Matterhorn is 14,500 feet tall, more than ten times as tall: 4,478 meters tall. So at the top of Worcester[shire] Beacon you were at the highest point you could get to.
00:03:32 --> 00:04:01
There's nothing you could do, no direction you could move that would make you better than where you are. In fact, everything you do would make you worse. You'd go downhill. But you weren't at the highest point – the Matterhorn's a lot higher. And of course, if you went into the Himalayas – K2, Everest – far higher again. Now that's a story about hill climbing. But that hill climbing applies to prototyping.
00:04:01 --> 00:04:32
When you're prototyping, you're doing iterative design, you are hill climbing the design space. You're looking at the design you've got and you're making it a bit better every time. Now, sometimes you just end up with a really, really good design. But of course, in the physical world, if you start in the wrong place, you don't end up in the highest position. Similarly, if you're prototyping and if you're designing iteratively, if your initial design is a rubbish design, you just end up with a slightly-better-polished rubbish design
00:04:32 --> 00:05:00
at the end of iterative prototyping. If you start off with a really good design, then you end up with a really-polished good design at the end. The start point matters critically. Now when you understand that, you can start to work out what to do. Sometimes that means really completely stepping back, particularly if you find yourself sort of going around circles in your design. Sometimes you do. Every time you fix something, you break something else.
00:05:00 --> 00:05:34
The time to stand back. Or what you might do, which is a technique used for actually computational optimization. You might start with lots and lots of designs and sort of work with them all a bit. See how they all work out and then perhaps throw out the least good ones and go with the best ones. You see that graphical designers do that a lot. It's hard to do that with interaction design because you have to commit a bit more. So it's really important that you don't just rely on the iterative process to fix the fact
00:05:34 --> 00:06:00
you started off with a poor design. You need a really good design to start with, which means you really have to understand deeply what's going on. But also, when you're in the middle of that iterative design process, it's really important to keep an eye on what's going on and to actually ask yourself every so often: "Am I in the right place?" And sometimes you do have to actually call a stop to it. You've learned a lot by where you are, but actually step back and say,
00:06:00 --> 00:06:12
"Actually, we're going to have to completely change some aspects of what we're doing." And basically take the helicopter from the Malverns to the Matterhorn.
High-fidelity prototypes bridge the gap between the design concept and the final product. Designers use this type of prototype to simulate and test a realistic user experience of the product, identify potential issues and gather feedback. This allows for a better refinement of the product before development commences. In other words, hi-fi prototypes help identify and tackle issues early, which saves costs by reducing expensive design overhauls late in the development cycle. Also, they facilitate smoother handoffs between design and development teams, which minimize misunderstandings and delays that can increase project costs.
In this video, Co-founder of Hype4 Szymon Adamiak explains how to improve design handoffs.
ShowHide
video transcript
00:00:00 --> 00:00:31
How We Can Communicate Better So, the first thing is that we need to establish some *ground rules*. When developers get a design, they know nothing about the product, usually, or almost nothing. And you designers know everything – you are the authority. We just lay the code bricks here and there.
00:00:31 --> 00:01:03
So, *your job is to share your knowledge, share the context with us*, and *our job is to listen, to absorb it*. And this is a moment where there are the most problems. And I think that the reason is that we often *share some misconceptions* about each other's work, and designers often think that their job is to create a design, hand it off, and their job is done.
00:01:03 --> 00:01:34
They also tend to believe that developers are lazy and don't do a good enough job with the designs. And, actually, that's often true, unfortunately. Even in my company – my company started as a design-only agency, and my partner is a designer, but he's seen over and over again how developers execute the design
00:01:34 --> 00:02:03
and that the design was a totally different thing than the final product. And this is a realistic example, to be honest, so the colors are more or less fine but it doesn't look how it should at all. So, it really happens. And it happens a lot. And also, developers have many problems with designers, especially with some changes in the designs
00:02:03 --> 00:02:31
that we are not aware of and they are made. And also, many times designers think that something is just a minor change. You have to do it, and you have to do it fast – and, for us, it's a huge thing and not possible to change in a week or even a month sometimes. So, these accusations are sometimes true but it shouldn't really matter
00:02:31 --> 00:03:01
because we both have our flaws and we have to recognize those flaws, and focusing on that creates a really toxic and unfriendly work environment. So, I think we don't have to avoid making mistakes and talking about them, but *embrace* them. So, I think there are two important mindset shifts that can help us.
00:03:01 --> 00:03:32
One is to *change the way we think about handoff*. So, handoff – I don't even like the word 'handoff' because it sounds like a one-time thing, and it really isn't, especially now. It's more of a process. And I really like the term that Brad Frost coined about handoff: He calls it a 'hot potato' process. And the difference between – I called it 'waterfall' here – but the old way when the designer works,
00:03:32 --> 00:04:04
hands off the design, and then the developer works, and the hot potato process is that 'hot potato' process. In the 'hot potato' process, we work at the same time. So, usually the designers start work, they create some screens, they give it to developers, and we start building them, and we start exchanging information, communicating, improving, working in iterations. So, most digital products nowadays are created like that.
00:04:04 --> 00:04:35
So, that's the first mindset shift. We should stop thinking about handoff as a one-time thing and *start to think about it as a process*. And the second mindset shift is *giving others the benefit of the doubt*. And I already mentioned that we will make mistakes that happen; we can fix them, we can improve them, and in my experience not thinking about designers as someone who's just an evil overlord
00:04:35 --> 00:04:47
who changes designs when they want, but like another human being who has their problems, too, and their job is very hard. It helps a lot in cooperation.
What’s more, high-fidelity prototypes facilitate collaboration between the design team and stakeholders. They help visualize the project, keep all parties aligned and are especially useful when liaising with people with no design background. Ultimately, high-fidelity prototypes help secure stakeholder buy-in.
High-Fidelity Prototypes vs. Low-Fidelity Prototypes: What’s the Difference
Fidelity refers to the level of detail and functionality of a prototype. Usually, this will depend on the product’s development stage. A prototype can give a wide view of the entire system or subsystem (called a horizontal prototype—e.g., an entire website) or it can give a detailed view of just one feature (a vertical prototype—e.g., a checkout process).
The level of fidelity for a prototype should be appropriate to present to users in user testing so they can give focused feedback.
Here are the main differences:
Low-fidelity
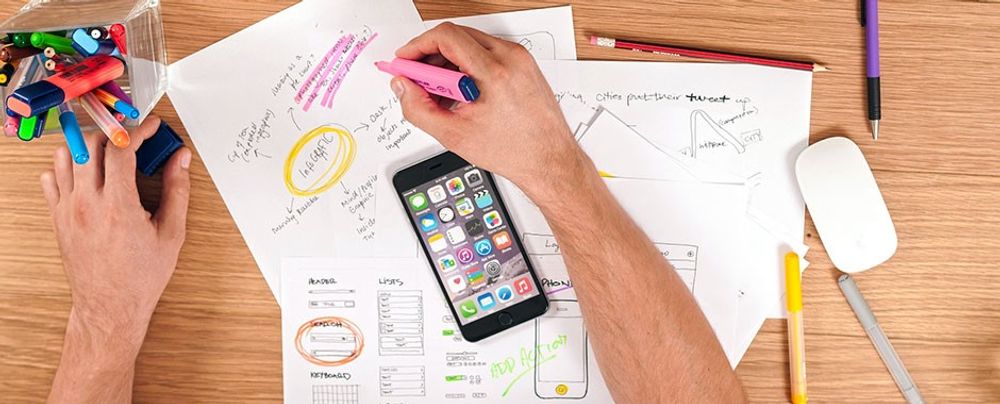
Example: Paper prototypes.
Pros: Fast and cheap; disposable; easy to make changes and test new iterations; allow a quick overall view of the product; anyone can produce them; encourage design thinking since prototypes are visibly not finalized.
Cons: Lack of realism, so users might have a hard time giving feedback; hard to apply results from crude early versions; may be too basic to reflect the user experience of the finished product; can oversimplify complex issues; lack of interactivity deprives users of direct control; users must imagine how they would use the product.
Paper prototyping is a rapid design method involving hand-drawn sketches or printed representations of a user interface. This low-fidelity approach allows designers to quickly visualize and test design concepts without the constraints of digital tools.
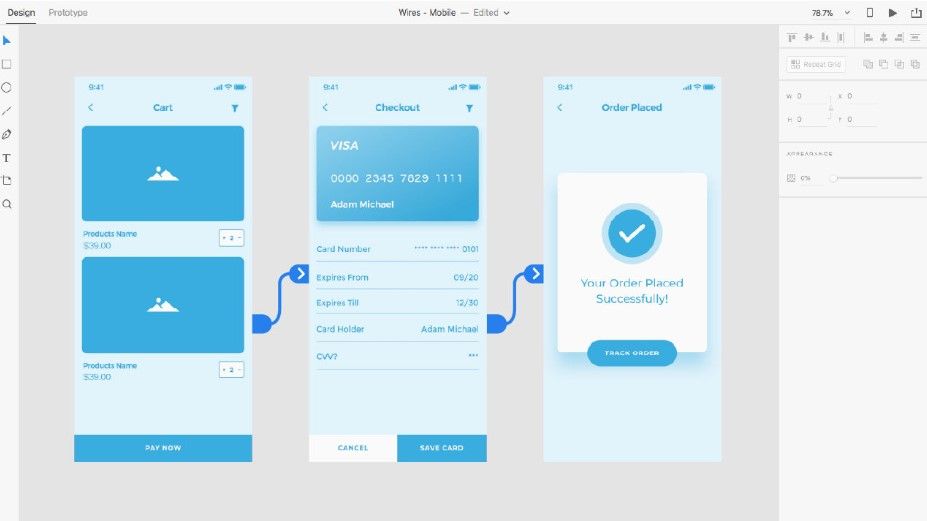
Example: Digital prototypes created on software such as Figma.
Pros: Engaging—all stakeholders have the vision realized in their hands and can judge how well it matches users’ needs and solves their problems; testing will yield more accurate, more applicable results; versions closest to the final product enable you to predict how users will take to it in the marketplace.
Cons: Longer/costlier to create; users are more likely to comment on superficial details than on content; after hours of work, you the designer are likely to dislike the idea of making changes, which can take considerable time; users may mistake the prototype for the finished product and form biases.
Interactive prototypes are advanced high-fidelity mockups that enable users to interact with the design, simulating real-world usage. They offer a more immersive experience compared to static prototypes.
Some designers split high-fidelity prototyping into “mid-fidelity” (where prototypes can have basic digital interactivity or be slick wireframes) and “high-fidelity” (where they’re far closer to the final version). Interactive prototypes yield far more useful results in user tests. However, fidelity is relative—a static mockup of a landing page, for example, is of higher fidelity than sketched cut-outs users can move. Overall, the right prototype depends on the project stage and the specific product.
What are some recommended books that cover high-fidelity prototypes well?
Mastering UX Design with Effective Prototyping: Turn your ideas into reality with UX prototyping by Apurvo Ghosh.
The Design of Everyday Things by Don Norman. This book emphasizes the importance of user-centered design and provides valuable insights into creating intuitive and user-friendly interfaces. It covers the principles that underpin high-fidelity prototyping.
When should I use a high-fidelity prototype in the design process?
Use high-fidelity prototypes to test and refine the final product's look, feel, and functionality. They are crucial for realistic usability tests and stakeholder presentations, providing detailed and interactive representations. High-fidelity prototypes validate design decisions, reduce costly changes during development, and serve as precise references for developers. Companies like Google and Apple use them to perfect their designs. Continuously iterate based on user feedback.
A high-fidelity prototype should be highly detailed to closely mimic the final product. This includes precise visuals with exact colors, fonts, and graphics, as well as interactive elements like clickable buttons, hover effects, and animations. It should use real or simulated content, incorporate key features and user flows, and provide feedback for user actions. Detailed high-fidelity prototypes help identify usability issues that low-fidelity prototypes might miss.
Can high-fidelity prototypes be used for user testing?
Yes, high-fidelity prototypes are ideal for user testing because they closely resemble the final product. These prototypes include detailed visuals, interactions, and real content, allowing users to experience the design as they would with the actual product. This realism helps identify usability issues, gather accurate feedback, and refine the design before development.
How much time should I allocate to creating a high-fidelity prototype?
The time required to create a high-fidelity prototype varies based on project complexity, detail level, and tools used, typically ranging from several days to a few weeks. Simple interfaces may take a few days, while complex applications can take weeks. High-fidelity prototypes should include detailed visuals, interactions, and real content, which can be time-consuming. For instance, a basic mobile app might take about a week, while a complex web application could take several weeks.
What fidelity level is appropriate for presenting to clients?
The appropriate fidelity level for presenting to clients depends on the project stage. In the early stages, use low-fidelity prototypes like wireframes or sketches to present initial concepts, focusing on layout and basic navigation. In the mid stages, switch to medium-fidelity prototypes that incorporate more detailed designs and some interactivity. For the late stages, high-fidelity prototypes are ideal, as they closely resemble the final product with detailed visuals and interactions. This progression helps clients understand and provide feedback at each stage, ensuring alignment before development begins.
Are high-fidelity prototypes necessary for all projects?
High-fidelity prototypes are not necessary for all projects, but they are highly beneficial in certain contexts. For complex projects requiring detailed user interactions, accurate visual representation, and thorough usability testing, high-fidelity prototypes are essential. They help identify and fix design issues before development, saving time and resources. For simpler projects or early-stage concept validation, low or medium-fidelity prototypes may suffice. These prototypes are quicker to create and iterate, allowing for rapid feedback and adjustments. Ultimately, the decision to use high-fidelity prototypes depends on the project's complexity, stage, and specific needs for accuracy and detail.
“Your portfolio is your best advocate in showing your work, your skills and your personality. It also shows not only the final outcomes but the process you took to get there and how you aligned your design decisions with the business and user needs.”
— Morgane Peng, Design Director, Societe Generale CIB
In many industries, your education, certifications and previous job roles help you get a foot in the door in the hiring process. However, in the design world, this is often not the case. Potential employers and clients want to see evidence of your skills and work and assess if they fit the job or design project in question. This is where portfolios come in.
Your portfolio is your first impression, your foot in the door—it must engage your audience and stand out against the hundreds of others they might be reviewing. Join us as we equip you with the skills and knowledge to create a portfolio that takes you one step closer to your dream career.
The Build a Standout UX/UI Portfolio: Land Your Dream Job courseis taught by Morgane Peng, a designer, speaker, mentor and writer who serves as Director of Experience Design at Societe Generale CIB. With over 12 years of experience in management roles, she has reviewed thousands of design portfolios and conducted hundreds of interviews with designers. She has collated her extensive real-world knowledge into this course to teach you how to build a compelling portfolio that hiring managers will want to explore.
In lesson 1, you’ll learn the importance of portfolios and which type of portfolio you should create based on your career stage and background. You’ll discover the most significant mistakes designers make in their portfolios, the importance of content over aesthetics and why today is the best day to start documenting your design processes. This knowledge will serve as your foundation as you build your portfolio.
In lesson 2, you’ll grasp the importance of hooks in your portfolio, how to write them, and the best practices based on your career stage and target audience. You’ll learn how and why to balance your professional and personal biographies in your about me section, how to talk about your life before design and how to use tools and resources in conjunction with your creativity to create a unique and distinctive portfolio.
In lesson 3, you’ll dive into case studies—the backbone of your portfolio. You’ll learn how to plan your case studies for success and hook your reader in to learn more about your design research, sketches, prototypes and outcomes. An attractive and attention-grabbing portfolio is nothing without solid and engaging case studies that effectively communicate who you are as a designer and why employers and clients should hire you.
In lesson 4, you’ll understand the industry expectations for your portfolio and how to apply the finishing touches that illustrate your attention to detail. You’ll explore how visual design, menus and structure, landing pages, visualizations and interactive elements make your portfolio accessible, engaging and compelling. Finally, you’ll learn the tips and best practices to follow when you convert your portfolio into a presentation for interviews and pitches.
Throughout the course, you'll get practical tips to apply to your portfolio. In the "Build Your Portfolio" project, you'll create your portfolio strategy, write and test your hook, build a case study and prepare your portfolio presentation. You’ll be able to share your progress, tips and reflections with your coursemates, gain insights from the community and elevate each other’s portfolios.
All open-source articles on High-Fidelity Prototypes
What UX Tools Do I Need to Create My Portfolio, and How Do I Learn Them?
“What UX tools should I learn so that I can build my portfolio?” “How do I learn UX tools?” We get these questions a lot
645 shares
3 weeks ago
Open Access—Link to us!
We believe in Open Access and the democratization of knowledge. Unfortunately, world-class educational materials such as this page are normally hidden behind paywalls or in expensive textbooks.