Your constantly-updated definition of Prototypes and
collection of videos and articles. Be a conversation starter: Share this page and inspire others!
703shares
What are Prototypes?
Prototypes are early models of a product that simulate its design and functionality. They are created to test concepts, gather feedback, and iterate on the design before the final product is developed.
Prototyping, on the other hand, is the experimental process of making prototypes. Teams build prototypes of varying degrees of fidelity, from low-fidelity paper prototypes to high-fidelity digital models that closely resemble the final product.
ShowHide
video transcript
00:00:00 --> 00:00:31
Prototyping helps you test and validate your designs early so that you can refine or even rethink your ideas and avoid costly mistakes further down the road. *Paper prototypes* are the fastest and cheapest way to get ideas out of your head and into users' hands. While digital versions might look more pleasing, you can create multiple versions on paper within a fraction of the time it takes to create a single one digitally. Paper prototypes also make it simple to conduct a Wizard of Oz session
00:00:31 --> 00:01:00
where you swap out elements to simulate interactions. Once you test and weigh your options, you can proceed to the digital version with the shortlisted option. If assembling paper prototypes feels cumbersome, you can take pictures of your paper wireframes and turn them into digital prototypes that users can use on real devices. Turning sketches into prototypes is as easy as taking a picture with your smartphone and linking different screens. You can use dedicated prototyping tools or even regular presentation tools
00:01:00 --> 00:01:13
to create a digital prototype from hand-drawn wireframes. The digitized paper prototype will be easier to handle for you and your users while still giving you the speed and flexibility of sketching.
“They slow us down to speed us up. By taking the time to prototype our ideas, we avoid costly mistakes such as becoming too complex too early and sticking with a weak idea for too long.”
— Tim Brown, CEO & President of IDEO
Discover how prototyping can help you access your users to fine-tune ideal products.
ShowHide
video transcript
00:00:00 --> 00:00:31
So, why do you need prototyping? Well, we never get things right first time. It's about getting things *better* when they're not perfect and also *starting in a good place*. Maybe if I'm going to make a wall for a house, I know exactly how big the wall should be. I can work out how many bricks I need. I can make it exactly the right size.
00:00:31 --> 00:01:00
So, I can get it right first time. It's important to. I don't want to knock the wall down and retry it several times. However, there I have a very clear idea of what I'm actually creating. With people involved, when you're designing something for people, people are not quite as predictable as brick walls. So, we *don't* get things right first time. So, there's a sort of classic cycle – you design something, you prototype it,
00:01:00 --> 00:01:31
and that prototyping might be, you might sort of get a pad of paper out and start to sketch your design of what your interface is going to be like and talk through it with somebody. That might be your prototype. It might be making something out of blue foam or out of cardboard. Or it might be actually creating something on a device that isn't the final system but is a "make-do" version, something that will help people understand.
00:01:31 --> 00:02:03
But, anyway, you make some sort of prototype. You give it to real users. You talk to the real users who are likely to be using that about it. You evaluate that prototype. You find out what's wrong. You redesign it. You fix the bugs. You fix the problems. You mend the prototype, or you make a different prototype. Perhaps you make a better prototype, a higher-fidelity prototype – one that's closer to the real thing. You test it again, evaluate it with people, round and round and round. Eventually, you decide it's good enough. "Good enough" probably doesn't mean "perfect", because we're not going to get things perfect, ever.
00:02:03 --> 00:02:33
But "good enough" – and then you decide you're going to ship it. That's the story. In certain cases in web interfaces, you might actually release what in the past might have been thought of as "a prototype" because you know you can fix it, and there might not be an end point to this. So, you might in delivering something – and this is true of any product, actually – when you've "finished" it, you haven't really finished, because you'll see other problems with it, and you might update it
00:02:33 --> 00:03:02
and create new versions and create updates. So, in some sense, this process never stops. In one way, it's easy to get so caught up with this *iteration* – that is an essential thing – that you can forget about actually designing it well in the first place. Now, that seems like a silly thing to say, but it is easy to do that. You know you're going to iterate anyhow. So, you try something – and there are sometimes good reasons for doing this –
00:03:02 --> 00:03:32
you might have *so little* understanding of a domain that you try something out to start with. However, then what you're doing is creating a *technology probe*. You're doing something in order to find out. Of course, what's easy then to think about is to treat that as if it was your first prototype – to try and make it better and better and better. The trouble is – if it didn't start good, it might not end up very good at the end, despite iteration. And the reason for that is a phenomenon that's called *local maxima*.
00:03:32 --> 00:04:02
So, what I've got here is a picture. You can imagine this is a sort of terrain somewhere. And one way to get to somewhere high if you're dumped in the middle of a mountainous place – if you just keep walking uphill, you'll end up somewhere high. And, actually, you can do the opposite as well. If you're stuck in the mountains and you want to get down, the obvious thing is to walk downhill. And sometimes that works, and sometimes you get stuck in a gully somewhere. So, imagine we're starting at this position over on the left. You start to walk uphill and you walk uphill and you walk uphill.
00:04:02 --> 00:04:31
And, eventually, you get onto the top of that little knoll there. It wasn't very high. Now, of course, if you'd started on the right of this picture, near the *big* mountain, and you go uphill and you go uphill and you go uphill and you get uphill, you eventually end up at the top of the big mountain. Now, that's true of mountains – that's fairly obvious. It's also true of user interfaces. *If you start off* with a really dreadful design and you fix the obvious errors,
00:04:31 --> 00:05:00
*then you end up* with something that's probably still pretty dreadful. If you start off with something that's in the right area to start with, you do better. So, the example I've put on the slide is the Malverns. The Malverns are a set of hills in the middle of the UK – somewhere to the southwest of Birmingham. And the highest point in these hills is about 900 feet. But there's nothing higher than that for miles and miles and miles and miles.
00:05:00 --> 00:05:30
So, it is the highest point, but it's not *the* highest point, certainly in Britain, let alone the world. If you want to go really high, you want to go to Switzerland and climb up the Matterhorn or to Tibet and go up Mount Everest, up in the Himalayas, you'll start somewhere better, right? So, if you start – or on the island I live on, on Tiree, the highest point is 120 meters. So, if you start on Tiree and keep on walking upwards, you don't get very high.
00:05:30 --> 00:06:04
You need to start in the *right* sort of area, and similarly with a user interface, you need to start with the *right* kind of system. So, there are two things you need for an iterative process. You need a *very good starting point*. It doesn't have to be the best interface to start with, but it has to be in the right area. It has to be something that when you improve it, it will get really good. And also – and this is sort of obvious but actually is easy to get wrong – you need to understand *what's wrong*. So, when you evaluate something, you really need to understand the problem.
00:06:04 --> 00:06:31
Otherwise, what you do is you just try something to "fix the obvious problem" and end up maybe not even fixing the problem but certainly potentially breaking other things as well, making it worse. So, just like if you're trying to climb mountains, you need to start off in a good area. Start off in the Himalayas, not on Tiree. You also need to know which direction is up.
00:06:31 --> 00:07:03
If you just walk in random directions, you won't end up in a very high place. If you keep walking uphill, you will. So, you need to *understand where to start* and *understand which way is up*. For prototyping your user interface, you need a *really rich understanding* of *your users*, of the nature of *design*, of the nature of the *technology* you're using, in order to start in a good place. Then, when you evaluate things with people,
00:07:03 --> 00:07:30
you need to try and *really deeply* understand what's going on with them in order to actually *make things better* and possibly even to get to a point where you stand back and think: "Actually, all these little changes I'm making are not making really a sufficient difference at all. I'm going around in circles." Sometimes, you have to stand right back and make a *radical change* to your design. That's a bit like I'm climbing up a mountain
00:07:30 --> 00:08:00
and I've suddenly realized that I've got stuck up a little peak. And I look out over there, and there's a bigger place. And I might have to go downhill and start again somewhere else. So, iteration is absolutely crucial. You won't get things right first time. You *alway*s need to iterate. So, prototyping – all sorts of prototypes, from paper prototypes to really running code – is very, very important. However, *crucial to design is having a deep and thorough understanding of your users*,
00:08:00 --> 00:08:05
*a deep and thorough understanding of your technology and how you put them together*.
The Power of Prototypes: The Benefits That Drive Innovation
Prototyping is the fourth phase of both design thinking and design sprints. It’s an essential part of user experience (UX) design that usually comes after ideation, where a designer or design team have created and selected ideas that can solve users’ needs. In prototyping, designers craft a simple experimental model of their proposed product. This allows them to assess how well the product aligns with user needs and expectations through valuable user feedback. Designers should incorporate prototyping into their process from the early stages, even using paper prototyping when appropriate. This early feedback from users can be instrumental in guiding the product's development.
Learn more about paper prototyping in this next video:
ShowHide
video transcript
00:00:00 --> 00:00:30
If you're looking at novel solutions, then paper prototyping is a great way of starting. This is a relatively short segment on paper prototyping, which is something that I don't think people really take very seriously, but they should do. It's a wonderful approach. It's very *cheap and easy to do* – so, low technology, low cost;
00:00:30 --> 00:01:02
can be done at the *very early stages* of design and development; *easy to create modify and animate* because you do all that by hand. It *avoids distractions with superficial detail*; a fixation that that button is too large or it's too small or it's too blue or what have you. It *prevents* the you-must-be-very-nearly-finished impression that sometimes customers get when you're showing them higher-fidelity mockups, without them realizing there's an awful lot of work that still needs to be done behind the screens.
00:01:02 --> 00:01:36
It's very much less intimidating to users. Users really do get that you're trying things out, and obviously they're quite keen to give you useful feedback. And tied up with that is the whole aspect that it just looks much more malleable, much more unfinished than any form of screen markup. So, as a concept, it's quite wonderful, but we don't do enough of it. It's not something you would actually do in an area where you're *revisiting* the same solution.
00:01:36 --> 00:02:02
So, if your organization produces a lot of e-commerce sites and you've done this particular kind of solution 10 times before, then obviously no need to paper-prototype. But if you're looking at novel solutions, if you're the next big startup and you want to make sure that people understand your proposition and they know how to work with it, then paper prototyping is a great way of starting.
00:02:02 --> 00:02:31
So, here's Carolyn Snyder, a friend of mine, who has written a book called *Paper Prototyping*. It's not a fantastically long or detailed book, but it does go through all the basics, and you can see just looking at this particular screenshot, or paper-shot even – it's not of a screen of course – it's showing little strips of paper that have been tacked on, and you can see that the cross on the
00:02:31 --> 00:03:01
– with color has just been applied with some sticky tape, literally, and the text in the box underneath has been done the same way. And it's just all done with users, with *a user*, typically, and an agreed script, an agreed set of pages. And you ask users to interact as if this was for real. And they tell you what they would do, and you play-act it. So, it's fairly standard office supplies. You can do most paper prototyping with about
00:03:01 --> 00:03:28
10 pounds', dollars' or euros' worth of office stationery. You need to, as I mention here, make sure that you've *tested* your process before the user arrives, that you know what you're going to do *if* certain things happen, and you need to *agree with the team* what this process is meant to look like so that you're not basically testing something different from what the design team is proposing to do.
Prototyping is more than just a step in the design process—it's a strategic investment that yields substantial returns. Here are some of the key advantages:
Risk Mitigation and Enhanced Communication
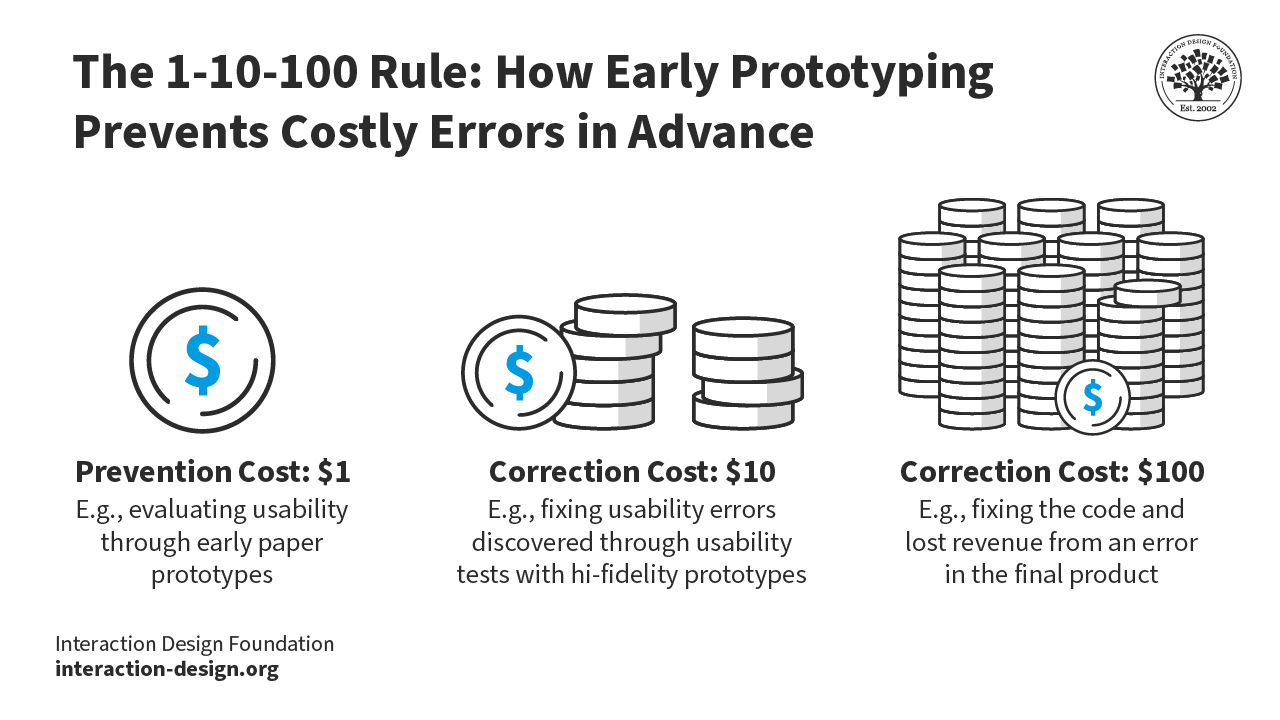
Prototypes act as safety nets, allowing designers to identify and address potential flaws or usability issues early in the design process. By visualizing and interacting with a prototype, designers can uncover problems that might not be apparent in abstract designs or specifications. This early detection prevents these issues from escalating into costly problems during development or after product launch.
What’s more, prototypes enhance communication by serving as a universal language that facilitates effective communication among designers, developers, stakeholders, and users. A prototype can bridge the gap between abstract concepts and concrete implementations, ensuring everyone has a clear understanding of the product's direction and functionality.
In this video, UX Designer and Author of Build Better Products and UX for Lean Startups, Laura Klein discusses collaboration between cross-functional teams:
ShowHide
video transcript
00:00:00 --> 00:00:30
Cross-functional teams, unlike silos, have all the people necessary to build a specific thing together. Let's look at an example. Imagine you're on a team that is supposed to build the onboarding flow for a new app that helps connect job applicants with jobs. You can't build the whole thing with just designers. Or with just engineers, for that matter. I mean, you probably could do it with just engineers, but it's a terrible idea.
00:00:30 --> 00:01:00
A cross-functional team for this onboarding work might include a few engineers, perhaps some for the front end and some for the back end. Might include a designer, a researcher, a product owner or manager, maybe a content writer or a marketing person. In an ideal world, all of these folks would only work on this particular team. In the real world, where we actually live, sometimes folks are on a couple of different teams and some specialists may be brought in to consult. For example, if the team needed help from the legal department to explain some of the ramifications of a specific decision,
00:01:00 --> 00:01:32
a cross-functional team would have a dedicated legal expert they could go to. But that legal expert might also work with lots of other teams. In agile environments, the cross-functional team generally sits together or if remote, has some sort of shared workspace. They all go to the required team meetings. They understand the goal of the team and the users. They're experts, or they soon become experts, on that onboarding flow. Contrast this to how it might be done in a siloed environment. In that case, you might have different people assigned to the team depending on need, which can seem really flexible.
00:01:32 --> 00:02:00
Until you realize that you end up with five different designers working on the project all at different times and they all have to be brought up to speed and they don't really understand why the other designers made the decisions that they did. Same with the engineers. And do not get me started on legal. Silo teams tend to rely more on documentation that gets handed between groups. And this can lead to a waterfall project where project managers or product managers work on something for a while to create requirements, which they then hand off to designers who work on designs for a while
00:02:00 --> 00:02:29
and then they pass the deliverables on to engineering, who immediately insists that none of this will work and demands to know why they weren't brought in earlier for consultation. You get it. By working in cross-functional teams instead, the people embedded on the project get comfortable with each other. They know how the team works and can make improvements to it. They come to deeply understand their particular users and their metrics. They actually bring engineering and even design and research into the decision making process early to avoid the scenario I described above.
Cost-Effectiveness and Accelerated Innovation
Prototyping offers significant cost savings—it enables the early detection of errors, allowing designers to rectify them in an efficient and cost-effective manner. Modifying a prototype is far less costly than reworking a fully developed product, as changes become increasingly expensive as the project progresses.
What’s more, the iterative nature of prototyping accelerates innovation. Designers can rapidly experiment and explore multiple ideas and quickly test and refine them based on user feedback. This iterative process fosters creativity and leads to more innovative and effective solutions.
Prototyping can help catch potentially costly errors well in advance.
Stakeholder Buy-In
Prototypes provide a solid foundation for ideation and further improvements, giving all stakeholders a clear picture of the potential benefits, risks, and costs associated with the product's development. This transparency builds trust and fosters collaboration among team members.
User-centered design is at the heart of prototyping. By gathering invaluable feedback from real users throughout the design process, prototypes ensure that the final product aligns with user needs, preferences, and expectations. This user-centric approach not only leads to a more satisfying product but also fosters a sense of ownership among stakeholders which generates excitement and enthusiasm that can help secure support and resources.
Explore User Needs
Prototypes are a valuable tools for experimenting with various aspects of user needs and problems. This can lead to insights into less obvious areas of the user's world, such as unexpected usage patterns or unforeseen accessibility issues. By addressing these issues early on, designers avoid costly oversights and create a more inclusive and user-friendly product.
Reduce Time-to-Market
Finally, prototyping can significantly reduce time-to-market. By minimizing the number of errors that need correction before product release and adapting changes early in the process, the design and development process is streamlined, resulting in a faster launch. This allows companies to gain a competitive advantage and respond more quickly to market demands.
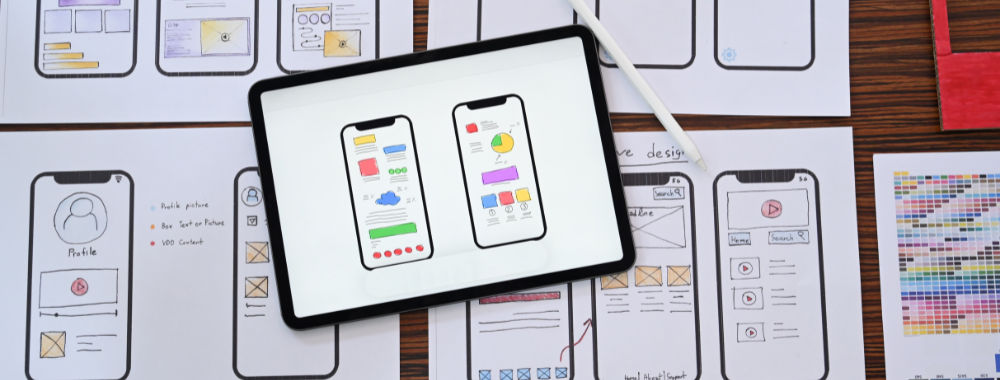
How to Understand Fidelity: Low-Fidelity vs Mid-Fidelity vs High-Fidelity Prototyping
Fidelity refers to the level of detail and functionality of a prototype. Usually, this will depend on the product’s development stage. A prototype can provide a wide view of the entire system or subsystem (called a horizontal prototype – e.g., an entire website) or one that gives a detailed view of just one feature (a vertical prototype – e.g., a checkout process). The level of fidelity of a prototype should be appropriate for presenting to users in user testing so they can give focused feedback.
Characteristics: Basic, often hand-drawn representations of a product's interface or flow, focusing on the core concept and user journey rather than visual details.
Pros: Fast and cheap to create; disposable; easy to make changes and test new iterations; provide a quick overview of the product; anyone can produce them; encourage design thinking as they are visibly not finalized.
Cons: Lack of realism can make it difficult for users to provide feedback; results from early versions may be hard to apply to the final product; lack of interactivity deprives users of direct control, requiring them to imagine how they would use the product; can oversimplify complex issues.
Best for: Early-stage concept exploration, brainstorming, and gathering initial user feedback on basic functionality and flow.
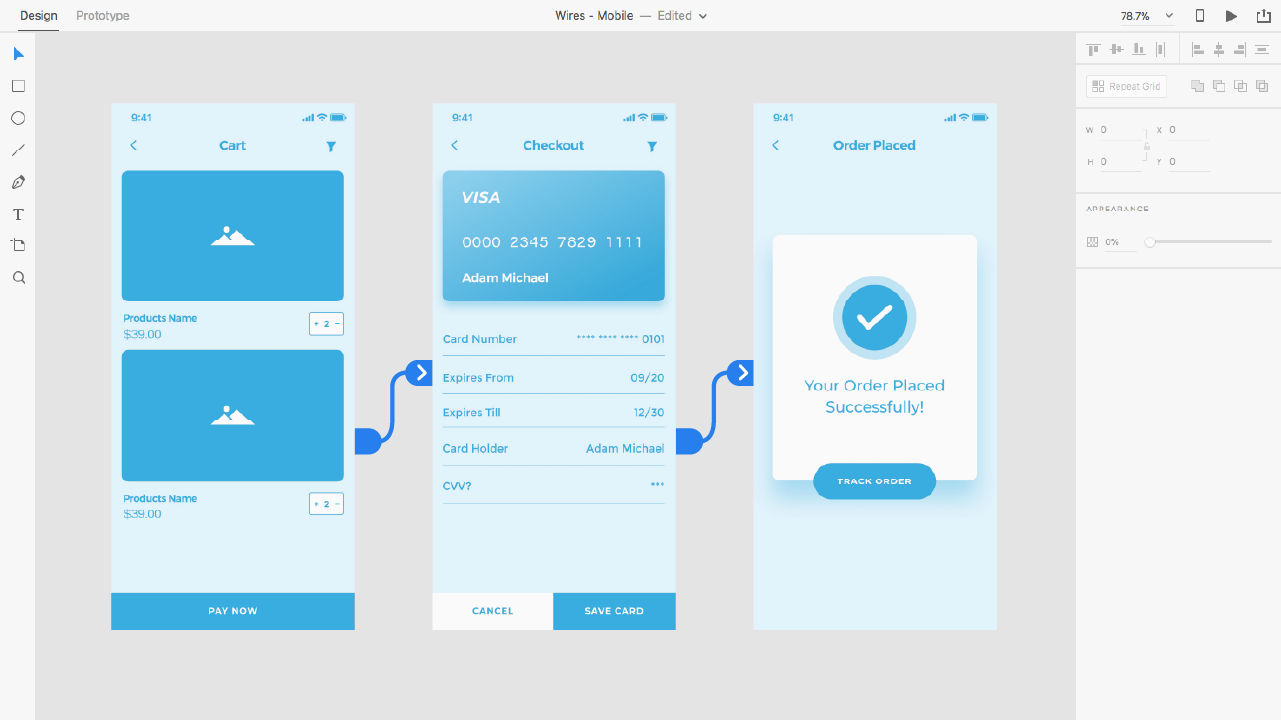
Characteristics: Bridge the gap between low and high fidelity, offering a more interactive and detailed representation. They typically include some visual design elements and basic interactions.
Pros: Provide a more realistic user experience than low-fidelity prototypes; allow for testing of basic interactions; relatively quick to create compared to high-fidelity versions.
Cons: May still lack visual polish and some advanced interactions; can be time-consuming to create compared to low-fidelity prototypes.
Best for: Testing specific features or interactions, refining user flows, and evaluating design concepts with a higher degree of realism.
Characteristics: Closely resemble the final product, with detailed visuals, interactions, and animations. They aim to simulate the actual user experience as closely as possible.
Examples: Digital prototypes created on software, interactive prototypes with realistic data, fully functional UI elements, microinteractions.
Pros: Engaging—stakeholders experience the vision firsthand and can judge its alignment with user needs; testing yields more accurate, applicable results; versions closest to the final product enable prediction of user reception in the marketplace.
Cons: Longer and costlier to create; users may focus on superficial details rather than content; designers may resist changes due to the investment of time and effort; users may mistake the prototype for the finished product and form biases.
Best for:Usability testing, evaluating the overall user experience, gathering detailed feedback on the final design, and demonstrating the product to stakeholders.
Fidelity is relative—a static mockup of a landing page, for example, is of higher fidelity than sketched cut-outs users can move.
Prototyping in Action: How to Bring Ideas to Life
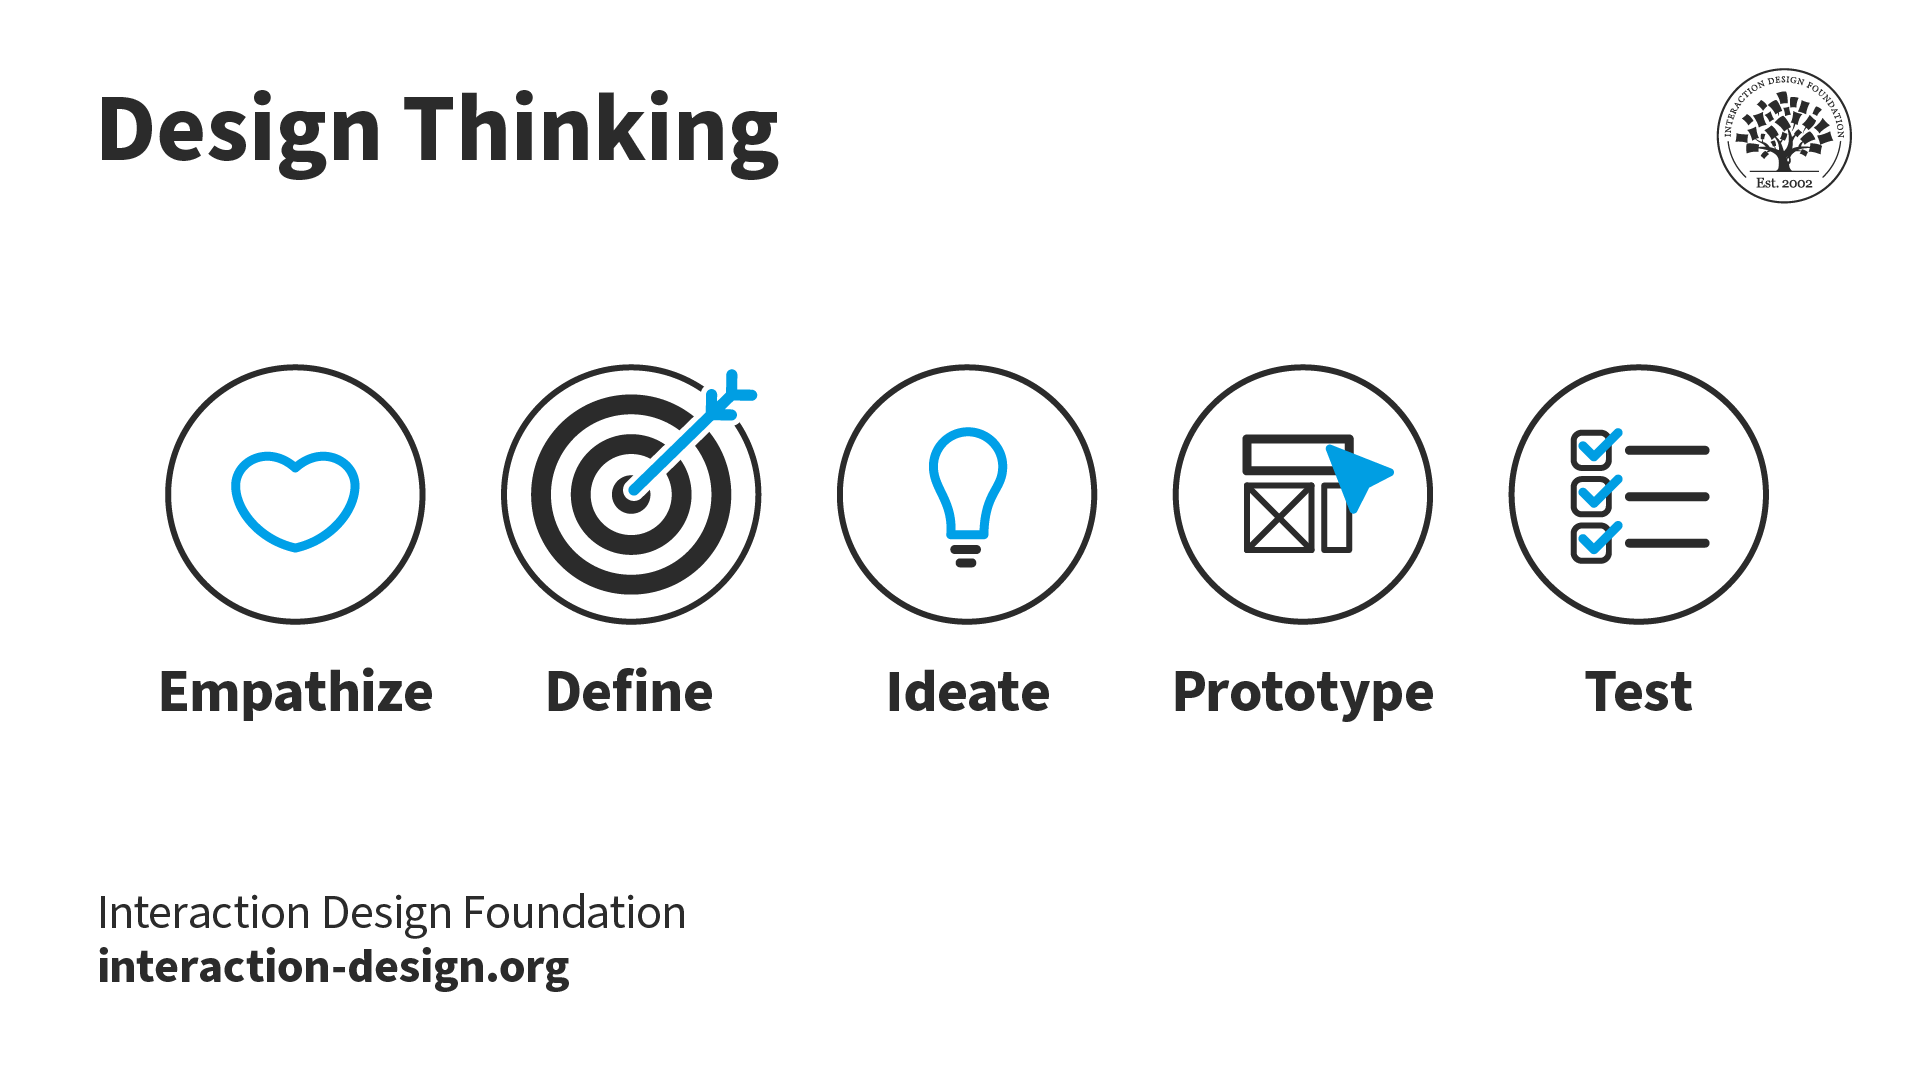
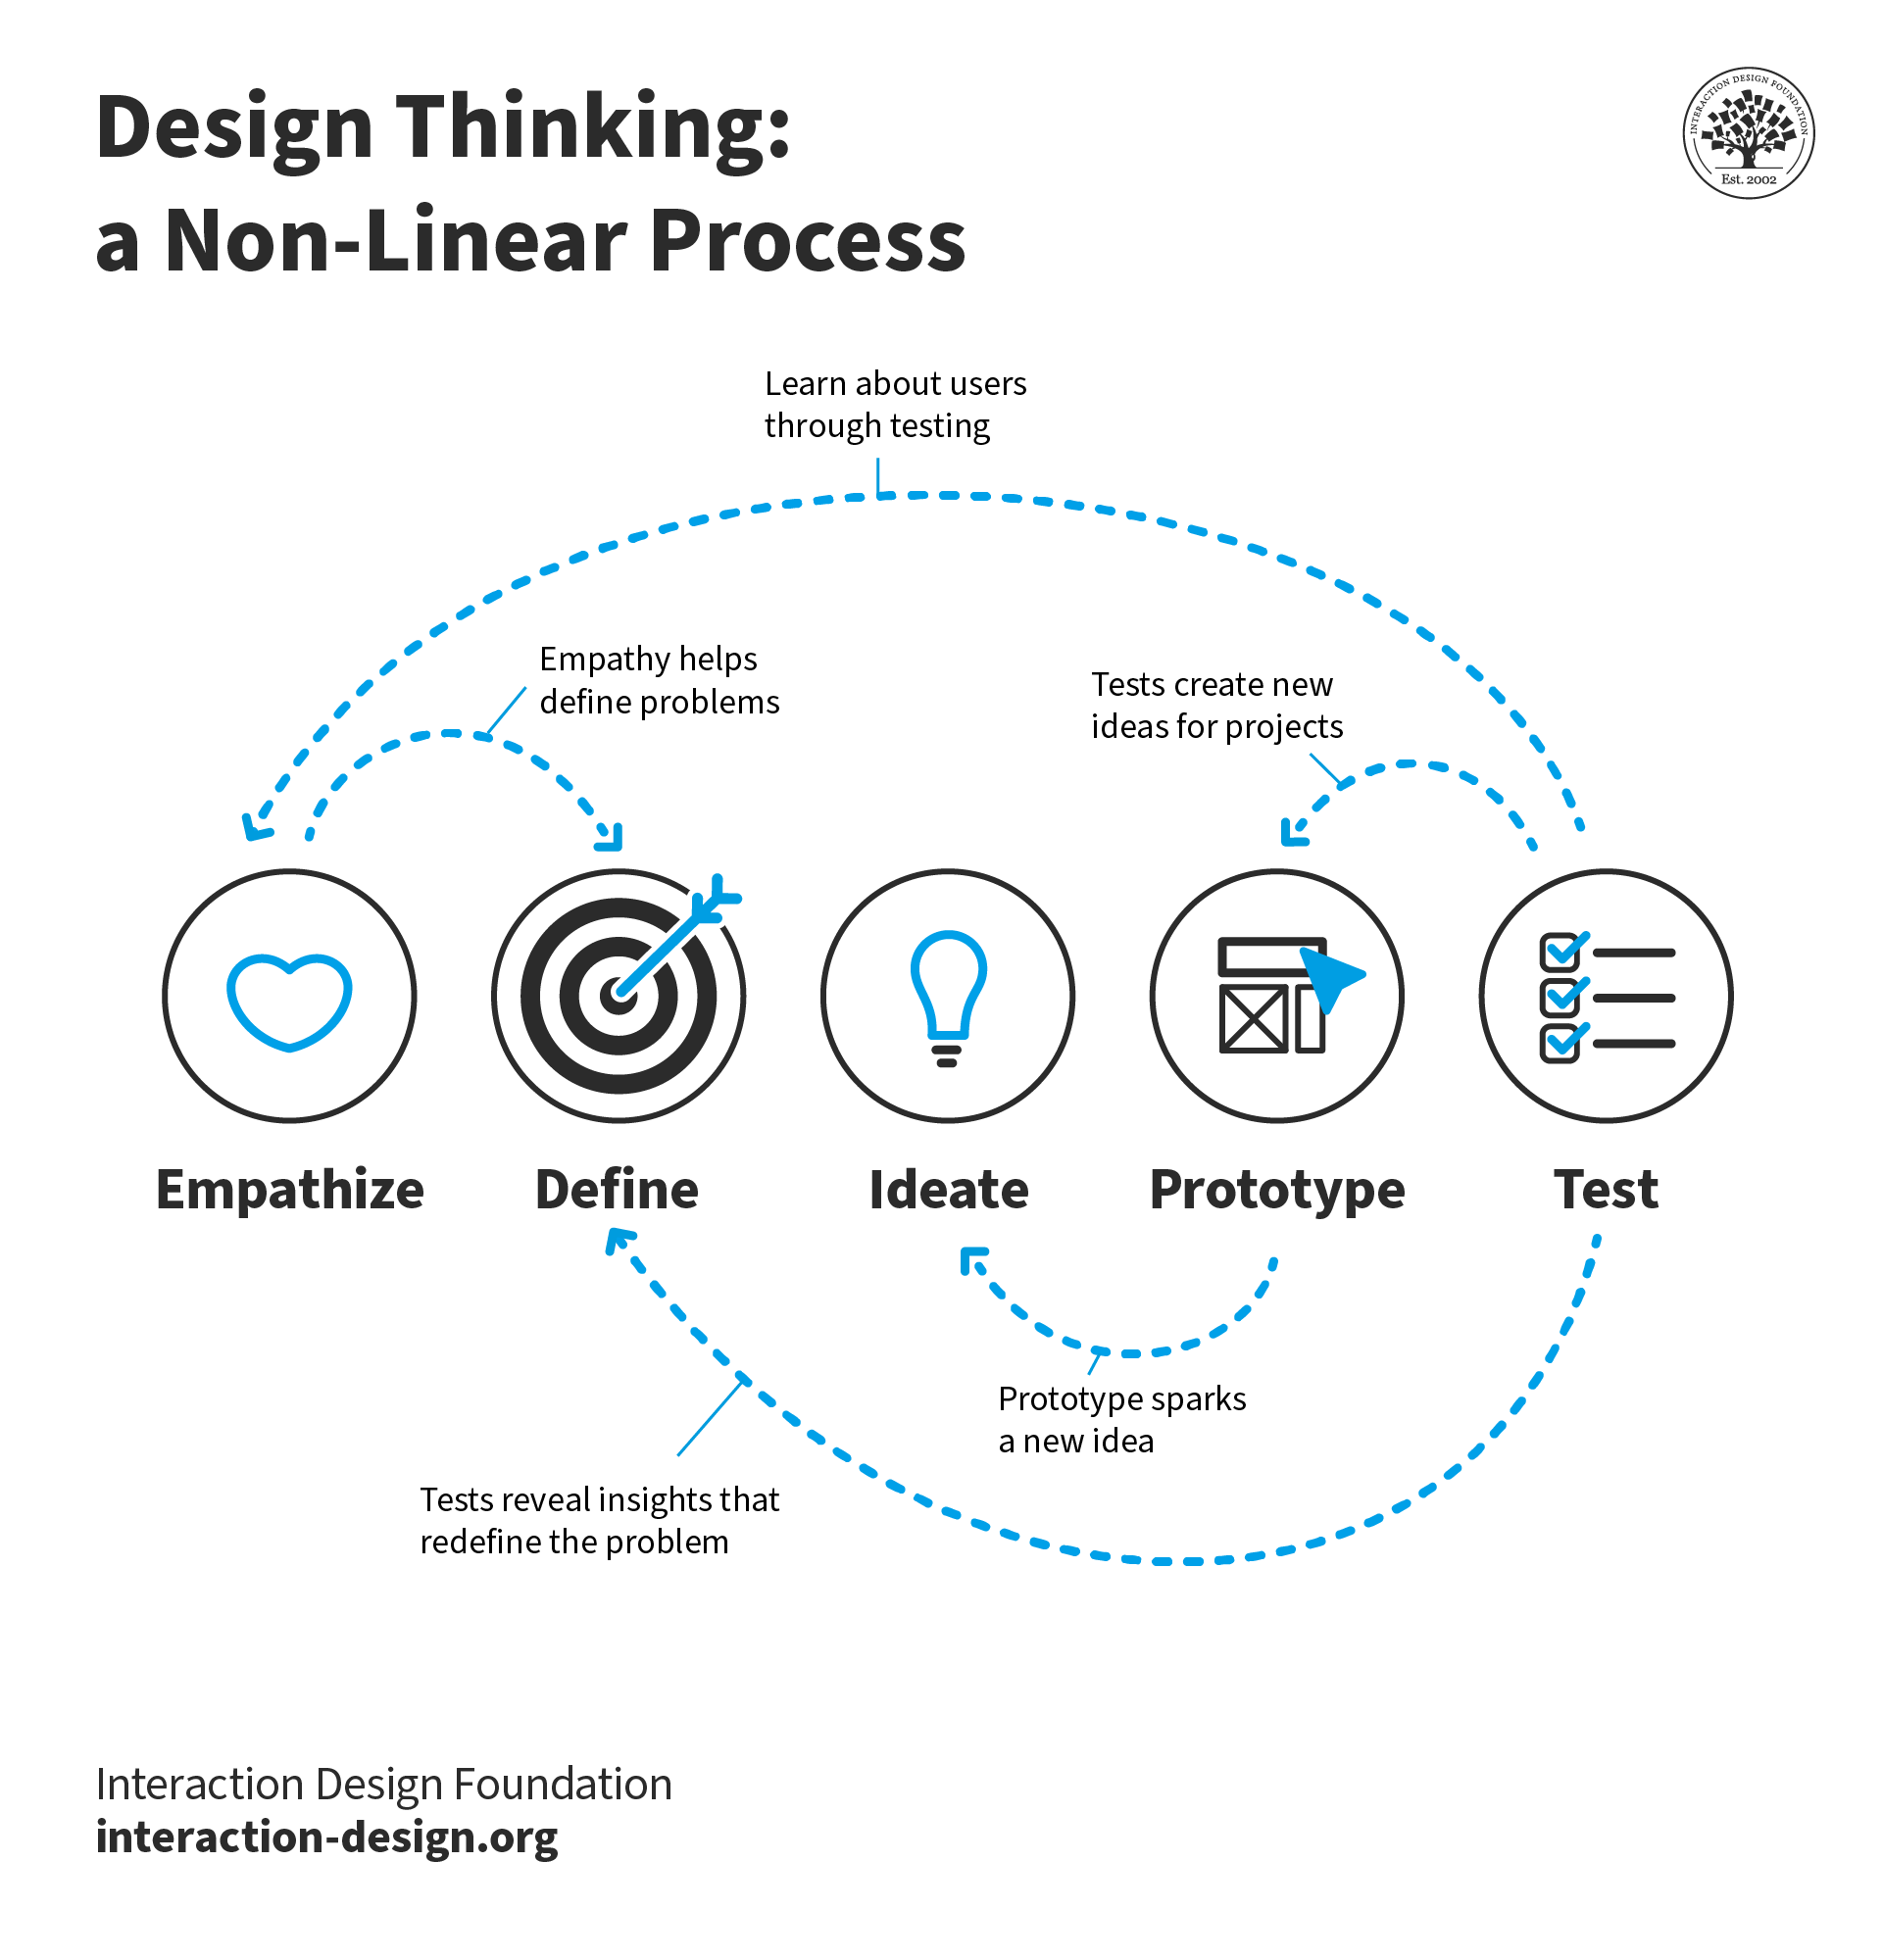
Prototyping is the fourth stage in the Design Thinking process, following empathize, define, and ideate. It’s the crucial point where abstract ideas and user insights are transformed into tangible representations. While many associate prototyping with building a physical or digital model, fundamentally it's about experimentation and learning.
Here's how prototyping connects with other stages of design thinking:
Step 1, Empathize: In this initial stage, designers step into their user’s shoes and try to immerse themselves in their world—this helps them gain a deep understanding of their needs, pain points, and aspirations. The insights gleaned during the empathize stage inform the prototyping process and make sure the prototype addresses real user problems.
Step 2, Define: The define stage synthesizes the research findings and defines a clear problem statement. This problem statement acts as a guiding light for the prototyping process so that efforts are focused on solving the right problem.
Step 3, Ideate: During the ideate stage, designers brainstorm a wide range of potential solutions to the problem statement. These ideas, whether wild or practical, serve as the foundation for prototyping. Prototypes allow designers to test and evaluate these ideas in a tangible form.
Step 5, Test: The final stage involves putting the prototype in front of users and gathering feedback. This feedback loop allows designers to refine and iterate on their design, ensuring the final product meets user needs and expectations.
The design thinking process isn't linear—it's a dynamic framework where designers can move between stages, revisiting previous phases as they gather new insights, challenge assumptions, and refine their solutions.
The Prototyping Process: A Roadmap for Effective Design
The prototyping process guides designers from initial concept to refined design. Here's a general outline of the prototyping process:
Define goals and objectives: Designers clearly articulate the purpose of their prototype, drawing on insights from the empathize and define stages. They determine what questions they are trying to answer, what aspects of the design they want to test, and what user needs they are trying to address.
Choose the right fidelity: Designers select the appropriate fidelity level for their prototype based on their project goals, stage of development, resources, and target audience. They consider whether a low-fidelity paper prototype (suitable for early-stage ideation) or a high-fidelity simulation (ideal for testing close to the final product) best suits their needs.
Create the prototype: Designers build their prototype using the chosen tools and techniques, incorporating the most promising ideas from the ideate stage. They start with the core user flows and interactions, focusing on the most critical aspects of the user experience.
Test and gather feedback: Designers share their prototype with stakeholders and potential users to gather feedback. They encourage constructive criticism and ask open-ended questions to gain insights into their experience and expectations.
Iterate and refine: Based on the feedback received, designers iterate on their prototype. They make necessary changes, refine interactions, and test new ideas. They repeat this process multiple times, continuously testing and refining.
Document and share: Designers document the prototyping process, including iterations, feedback, and decisions made. They share this documentation with their team and stakeholders to maintain transparency and provide a valuable reference for future development.
Test and validate: Designers conduct user testing with their final prototype to validate their design decisions and identify any remaining issues. This can involve usability testing, A/B testing, or other research methods. This stage is an essential step to ensure that the final product truly meets user needs.
Implement and launch: Once designers have thoroughly tested and refined their prototype, they incorporate the design into the final product development. They continue to monitor user feedback after launch to continue iterating and improving the user experience.
A well-crafted design portfolio is essential for designers to showcase their skills and experience to potential employers or clients. Including prototypes in a portfolio can elevate their work and demonstrate their ability to translate ideas into tangible experiences. Here's how designers can effectively integrate prototypes into their case studies:
Choose the best work: Designers should select case studies, projects and prototypes that best represent their skills and highlight their problem-solving abilities.
Provide context: Clearly explain how the prototype fits into the overall project narrative. Describe the problem being addressed, the specific goals the prototype aimed to achieve, and how it contributed to the final solution.
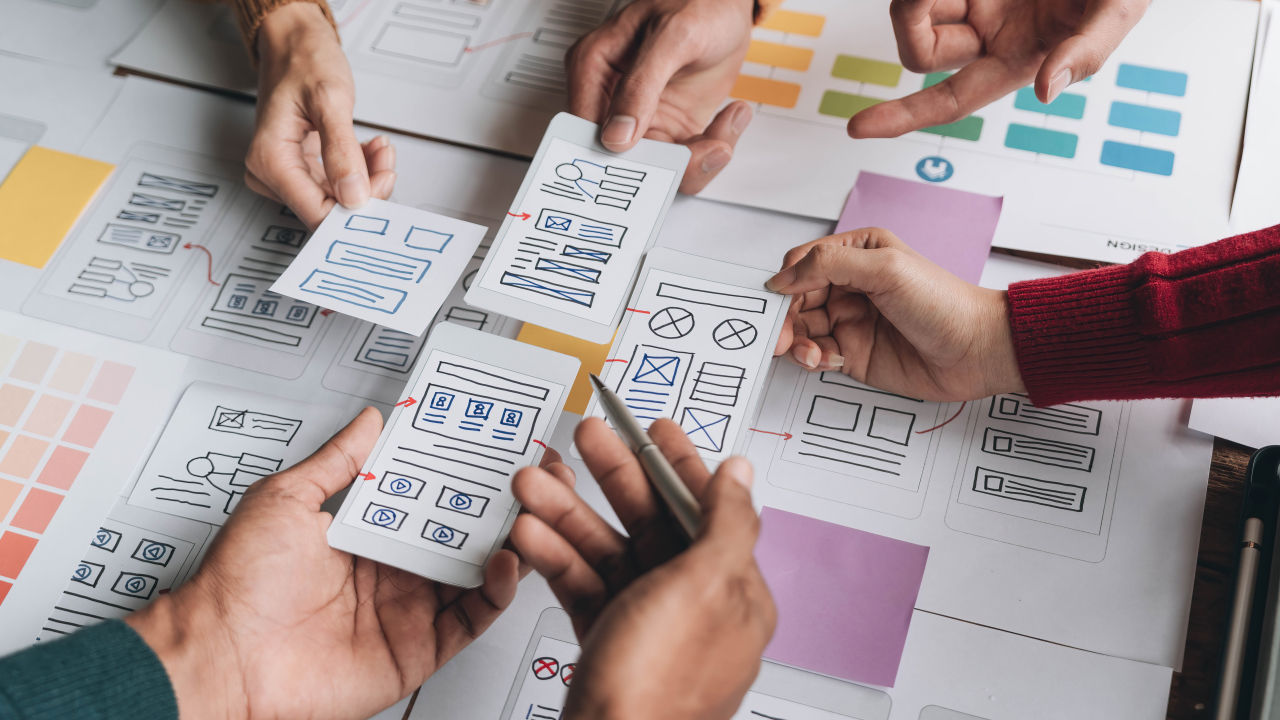
Use a variety of formats: Showcase different types of prototypes within a case study, such as initial sketches, wireframes, and interactive mockups. This illustrates the evolution of the design and the iterative process undertaken.
Interactive prototypes: If feasible, include interactive prototypes that allow viewers to click through and experience the user flow firsthand. This approach brings the case study to life and showcases the interactive aspects of the design.
Video demonstrations: Consider creating short video demonstrations of interactive prototypes as part of the case study presentation. This is particularly effective for showcasing complex interactions or animations that might be difficult to convey through static images.
User testing results: If available, incorporate summaries of user testing results or feedback received on prototypes directly into the case study. This demonstrates a commitment to user-centered design and the ability to gather and apply feedback to improve the design.
Link to live projects: If any of the prototypes have been developed into live products or websites, include links to them within the case study. This allows viewers to see the real-world impact of the design work and understand how the prototype translated into a final product.
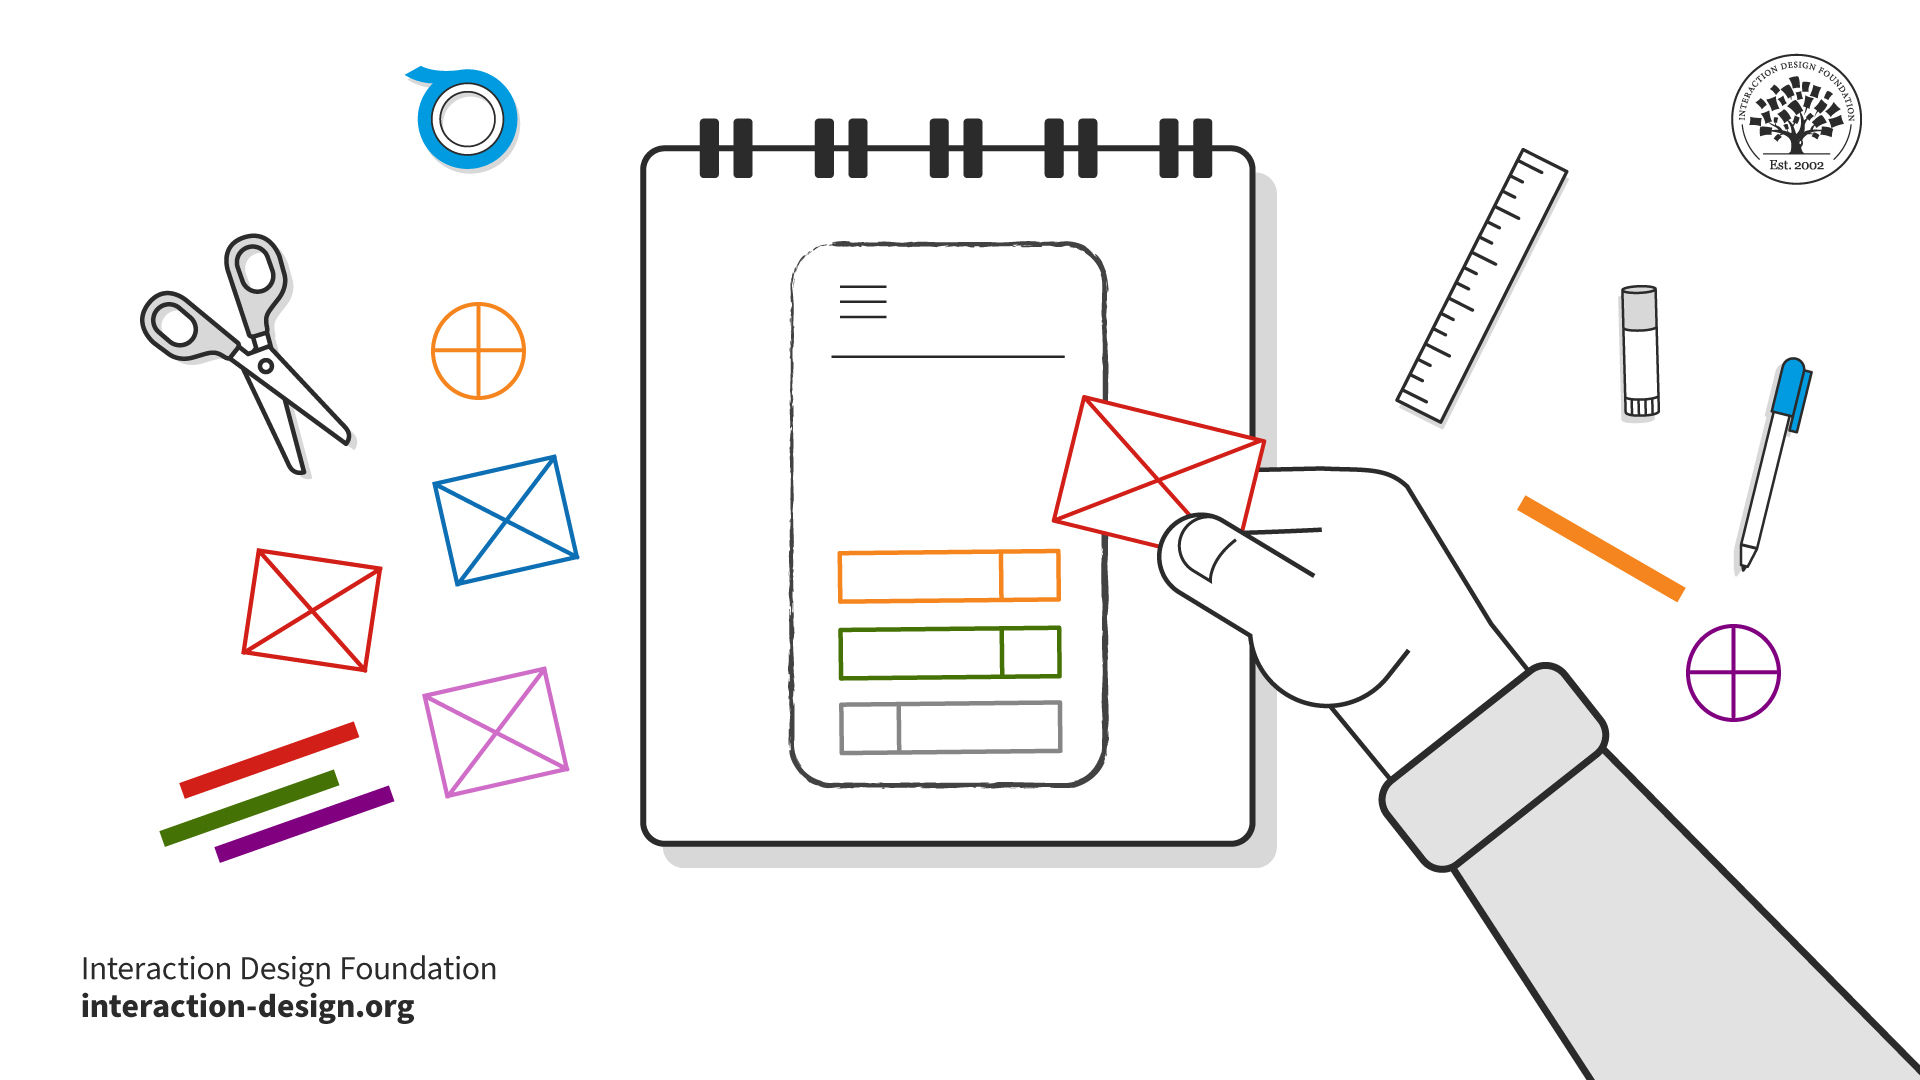
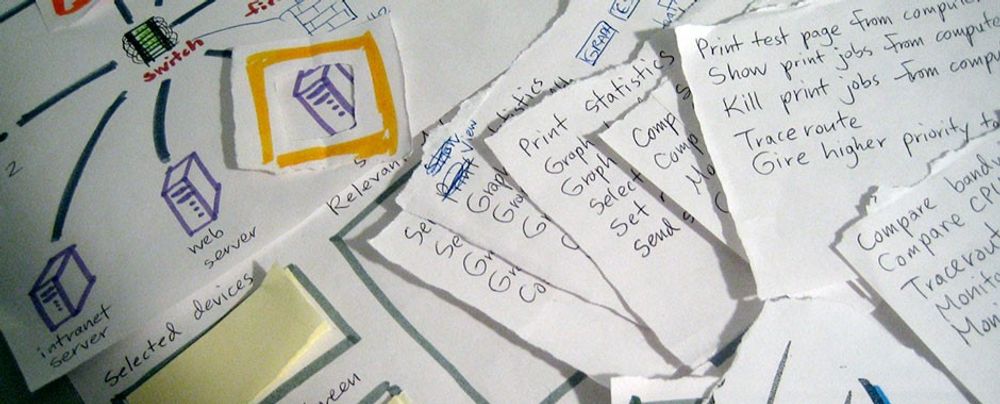
Five Common Low-Fidelity Prototyping Methods
Sketches: Although not technically prototypes, sketches serve as a powerful tool for making decisions. They are incredibly easy to create and discard, making them accessible to designers and non-designers alike. Use sketches in early, divergent stages of the design process to explore ideas, communicate concepts with teammates, and visualize user journeys.
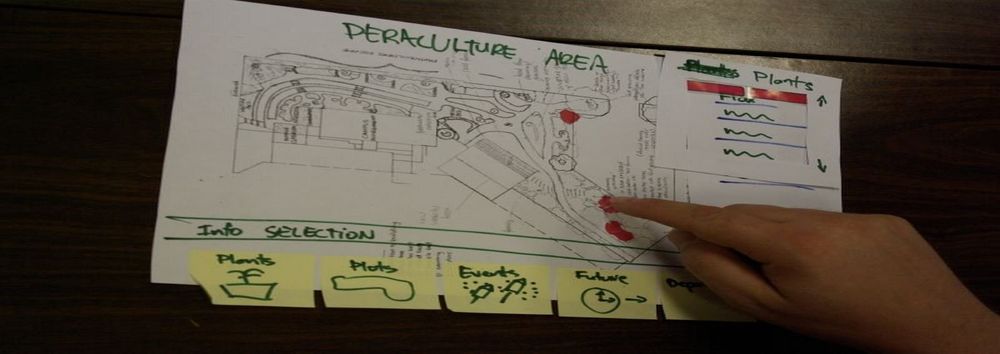
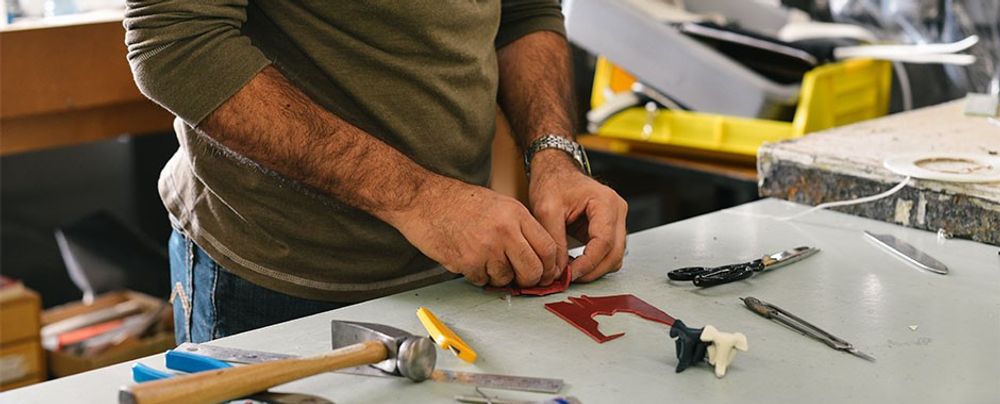
Paper Prototypes: These tangible prototypes involve creating rough "animations" by sliding pieces of paper to simulate user interactions. They are inexpensive, easy to modify, and allow designers to focus on the core concept rather than visual details. Paper prototypes are best suited for testing novel solutions and user flows, but are less helpful for evaluating standard UI patterns.
Lego Prototypes: Lego bricks offer a unique way to quickly create physical prototypes, especially for tangible products. Their versatility and ease of modification make them ideal for experimenting with form and function. Use Lego prototypes for empathizing with users, recreating user journeys, or visualizing complex systems.
Digital Wireframes: Wireframes are simple, bare-bones illustrations of an app or website's layout and functionality. They allow designers to focus on content structure and user flows, ignoring visual aspects. Wireframes are best used after the initial ideation phase, when the focus shifts to information architecture, layout, and space allocation.
Wizard of Oz Prototypes: These prototypes simulate complex interactions or functionality that may be difficult to implement early in development. A team member acts as the "wizard," manually controlling responses or actions behind the scenes. Wizard of Oz prototypes are useful for testing complex systems, future technologies, or voice interfaces, providing realistic user feedback without building a fully functional prototype.
Rapid prototyping, often exemplified by techniques like paper prototyping, is a user-centered approach that facilitates quick mockups of solutions. Using low-technology, low-cost materials, designers can simulate their solutions at the early stages of design. CEO of Syntagm, William Hudson highlights one such rapid prototyping method:
ShowHide
video transcript
00:00:00 --> 00:00:30
If you're looking at novel solutions, then paper prototyping is a great way of starting. This is a relatively short segment on paper prototyping, which is something that I don't think people really take very seriously, but they should do. It's a wonderful approach. It's very *cheap and easy to do* – so, low technology, low cost;
00:00:30 --> 00:01:02
can be done at the *very early stages* of design and development; *easy to create modify and animate* because you do all that by hand. It *avoids distractions with superficial detail*; a fixation that that button is too large or it's too small or it's too blue or what have you. It *prevents* the you-must-be-very-nearly-finished impression that sometimes customers get when you're showing them higher-fidelity mockups, without them realizing there's an awful lot of work that still needs to be done behind the screens.
00:01:02 --> 00:01:36
It's very much less intimidating to users. Users really do get that you're trying things out, and obviously they're quite keen to give you useful feedback. And tied up with that is the whole aspect that it just looks much more malleable, much more unfinished than any form of screen markup. So, as a concept, it's quite wonderful, but we don't do enough of it. It's not something you would actually do in an area where you're *revisiting* the same solution.
00:01:36 --> 00:02:02
So, if your organization produces a lot of e-commerce sites and you've done this particular kind of solution 10 times before, then obviously no need to paper-prototype. But if you're looking at novel solutions, if you're the next big startup and you want to make sure that people understand your proposition and they know how to work with it, then paper prototyping is a great way of starting.
00:02:02 --> 00:02:31
So, here's Carolyn Snyder, a friend of mine, who has written a book called *Paper Prototyping*. It's not a fantastically long or detailed book, but it does go through all the basics, and you can see just looking at this particular screenshot, or paper-shot even – it's not of a screen of course – it's showing little strips of paper that have been tacked on, and you can see that the cross on the
00:02:31 --> 00:03:01
– with color has just been applied with some sticky tape, literally, and the text in the box underneath has been done the same way. And it's just all done with users, with *a user*, typically, and an agreed script, an agreed set of pages. And you ask users to interact as if this was for real. And they tell you what they would do, and you play-act it. So, it's fairly standard office supplies. You can do most paper prototyping with about
00:03:01 --> 00:03:28
10 pounds', dollars' or euros' worth of office stationery. You need to, as I mention here, make sure that you've *tested* your process before the user arrives, that you know what you're going to do *if* certain things happen, and you need to *agree with the team* what this process is meant to look like so that you're not basically testing something different from what the design team is proposing to do.
Paper prototyping, as highlighted in the video, is especially beneficial for novel solutions. It's easy to create, modify, and animate, avoiding distractions with superficial details. Users find it less intimidating, promoting genuine feedback. It portrays a malleable, unfinished concept, making it perfect for brainstorming innovative ideas. For a comprehensive grasp on the iterative process behind such concepts and to delve deeper into innovative design methodologies, consider enrolling in our Design Thinking: The Ultimate Guide course.
How to make a prototype?
Making a prototype begins with understanding its purpose: to refine ideas and get closer to the desired solution.
ShowHide
video transcript
00:00:00 --> 00:00:31
So, why do you need prototyping? Well, we never get things right first time. It's about getting things *better* when they're not perfect and also *starting in a good place*. Maybe if I'm going to make a wall for a house, I know exactly how big the wall should be. I can work out how many bricks I need. I can make it exactly the right size.
00:00:31 --> 00:01:00
So, I can get it right first time. It's important to. I don't want to knock the wall down and retry it several times. However, there I have a very clear idea of what I'm actually creating. With people involved, when you're designing something for people, people are not quite as predictable as brick walls. So, we *don't* get things right first time. So, there's a sort of classic cycle – you design something, you prototype it,
00:01:00 --> 00:01:31
and that prototyping might be, you might sort of get a pad of paper out and start to sketch your design of what your interface is going to be like and talk through it with somebody. That might be your prototype. It might be making something out of blue foam or out of cardboard. Or it might be actually creating something on a device that isn't the final system but is a "make-do" version, something that will help people understand.
00:01:31 --> 00:02:03
But, anyway, you make some sort of prototype. You give it to real users. You talk to the real users who are likely to be using that about it. You evaluate that prototype. You find out what's wrong. You redesign it. You fix the bugs. You fix the problems. You mend the prototype, or you make a different prototype. Perhaps you make a better prototype, a higher-fidelity prototype – one that's closer to the real thing. You test it again, evaluate it with people, round and round and round. Eventually, you decide it's good enough. "Good enough" probably doesn't mean "perfect", because we're not going to get things perfect, ever.
00:02:03 --> 00:02:33
But "good enough" – and then you decide you're going to ship it. That's the story. In certain cases in web interfaces, you might actually release what in the past might have been thought of as "a prototype" because you know you can fix it, and there might not be an end point to this. So, you might in delivering something – and this is true of any product, actually – when you've "finished" it, you haven't really finished, because you'll see other problems with it, and you might update it
00:02:33 --> 00:03:02
and create new versions and create updates. So, in some sense, this process never stops. In one way, it's easy to get so caught up with this *iteration* – that is an essential thing – that you can forget about actually designing it well in the first place. Now, that seems like a silly thing to say, but it is easy to do that. You know you're going to iterate anyhow. So, you try something – and there are sometimes good reasons for doing this –
00:03:02 --> 00:03:32
you might have *so little* understanding of a domain that you try something out to start with. However, then what you're doing is creating a *technology probe*. You're doing something in order to find out. Of course, what's easy then to think about is to treat that as if it was your first prototype – to try and make it better and better and better. The trouble is – if it didn't start good, it might not end up very good at the end, despite iteration. And the reason for that is a phenomenon that's called *local maxima*.
00:03:32 --> 00:04:02
So, what I've got here is a picture. You can imagine this is a sort of terrain somewhere. And one way to get to somewhere high if you're dumped in the middle of a mountainous place – if you just keep walking uphill, you'll end up somewhere high. And, actually, you can do the opposite as well. If you're stuck in the mountains and you want to get down, the obvious thing is to walk downhill. And sometimes that works, and sometimes you get stuck in a gully somewhere. So, imagine we're starting at this position over on the left. You start to walk uphill and you walk uphill and you walk uphill.
00:04:02 --> 00:04:31
And, eventually, you get onto the top of that little knoll there. It wasn't very high. Now, of course, if you'd started on the right of this picture, near the *big* mountain, and you go uphill and you go uphill and you go uphill and you get uphill, you eventually end up at the top of the big mountain. Now, that's true of mountains – that's fairly obvious. It's also true of user interfaces. *If you start off* with a really dreadful design and you fix the obvious errors,
00:04:31 --> 00:05:00
*then you end up* with something that's probably still pretty dreadful. If you start off with something that's in the right area to start with, you do better. So, the example I've put on the slide is the Malverns. The Malverns are a set of hills in the middle of the UK – somewhere to the southwest of Birmingham. And the highest point in these hills is about 900 feet. But there's nothing higher than that for miles and miles and miles and miles.
00:05:00 --> 00:05:30
So, it is the highest point, but it's not *the* highest point, certainly in Britain, let alone the world. If you want to go really high, you want to go to Switzerland and climb up the Matterhorn or to Tibet and go up Mount Everest, up in the Himalayas, you'll start somewhere better, right? So, if you start – or on the island I live on, on Tiree, the highest point is 120 meters. So, if you start on Tiree and keep on walking upwards, you don't get very high.
00:05:30 --> 00:06:04
You need to start in the *right* sort of area, and similarly with a user interface, you need to start with the *right* kind of system. So, there are two things you need for an iterative process. You need a *very good starting point*. It doesn't have to be the best interface to start with, but it has to be in the right area. It has to be something that when you improve it, it will get really good. And also – and this is sort of obvious but actually is easy to get wrong – you need to understand *what's wrong*. So, when you evaluate something, you really need to understand the problem.
00:06:04 --> 00:06:31
Otherwise, what you do is you just try something to "fix the obvious problem" and end up maybe not even fixing the problem but certainly potentially breaking other things as well, making it worse. So, just like if you're trying to climb mountains, you need to start off in a good area. Start off in the Himalayas, not on Tiree. You also need to know which direction is up.
00:06:31 --> 00:07:03
If you just walk in random directions, you won't end up in a very high place. If you keep walking uphill, you will. So, you need to *understand where to start* and *understand which way is up*. For prototyping your user interface, you need a *really rich understanding* of *your users*, of the nature of *design*, of the nature of the *technology* you're using, in order to start in a good place. Then, when you evaluate things with people,
00:07:03 --> 00:07:30
you need to try and *really deeply* understand what's going on with them in order to actually *make things better* and possibly even to get to a point where you stand back and think: "Actually, all these little changes I'm making are not making really a sufficient difference at all. I'm going around in circles." Sometimes, you have to stand right back and make a *radical change* to your design. That's a bit like I'm climbing up a mountain
00:07:30 --> 00:08:00
and I've suddenly realized that I've got stuck up a little peak. And I look out over there, and there's a bigger place. And I might have to go downhill and start again somewhere else. So, iteration is absolutely crucial. You won't get things right first time. You *alway*s need to iterate. So, prototyping – all sorts of prototypes, from paper prototypes to really running code – is very, very important. However, *crucial to design is having a deep and thorough understanding of your users*,
00:08:00 --> 00:08:05
*a deep and thorough understanding of your technology and how you put them together*.
As HCI expert Prof. Alan Dix highlighted in the video, start by sketching your design, perhaps on paper, to visualize your idea. Depending on your needs, your prototype can be crafted from materials like blue foam, cardboard, or even digital tools for a "make-do" version to help users comprehend. Involve real users, gather their feedback, and evaluate and refine the prototype iteratively. It's crucial to remember that while iterating is essential, starting with a robust foundation based on a deep understanding of your users and technology ensures a better outcome.
You can download our guidelines in this template: “Six Best Practice Tips for Gathering Feedback on Your Prototypes”!
Get your free template for “Gathering Feedback on Your Prototypes”
What is a prototype in psychology?
In psychology, a prototype is essentially the most central or "typical" member of a category. Here's an example related to the category of "fruit."
Category: Fruit
Question: When you think of fruit, what's the first fruit that comes to mind?
Common Answer (Prototype): Apple
For many people, an apple might be the first fruit they think of, making it a prototype of the "fruit" category in their minds. It doesn't mean an apple is the "best" or "most accurate" representation of all fruits, but it's a central or typical example that people often associate with the category.
Now, let's say you show someone a series of pictures – a carrot, a tomato, and an apple – and ask which one is the most representative of "fruit." Most people would pick the apple because it fits their prototype for the category. This psychological concept of prototyping helps us quickly categorize and process information in our world.
While this concept is rooted in cognitive psychology, it holds relevance in design thinking, where understanding users' prototypes can aid in crafting intuitive interfaces. Dive deeper into prototypes and their significance in design from our What Kind of Prototype Should You Create? article.
What does prototype mean in business?
In business, a prototype serves as a preliminary model of a product or solution, enabling teams to visualize, test, and refine their ideas before full-scale production. This approach saves time and cost as businesses can course-correct early on.
Businesses can use prototyping for research as well as testing. Prototypes can help businesses user needs, streamline processes, and deliver value-added propositions. This iterative approach ensures that organizations not only meet customer expectations but also innovate effectively.
What is JS prototype?
JavaScript (JS) is a web programming language that developers use to create web pages. In the context of JS, a prototype serves as a template or blueprint from which other objects inherit properties and methods. In JavaScript, every object has a "prototype" from which it inherits properties and methods. This concept allows for object-oriented programming patterns, such as inheritance.
Note that the programming concept is different from using JavaScript to create design prototypes. Many teams opt for quick-and-dirty coded prototypes for testing solutions before building the actual product. Such prototypes may involve light coding, including HTML, CSS and JavaScript.
Is service design in demand?
Absolutely! As businesses increasingly recognize the value of delivering exceptional customer experiences, service design has become a pivotal discipline. It ensures seamless and holistic services that cater to both customer needs and business goals.
ShowHide
video transcript
00:00:00 --> 00:00:36
No matter which area of design you work in, the same rules apply. If you want to create a truly successful business or service, it's not enough to just create a great product in a vacuum. Instead, you have to ensure that each and every *touchpoint* with your brand or organization delivers a great service experience from *start* to *finish* – both for the business and employees and, of course, the customers. I'm Frank Spillers, and I've created this course on Service Design
00:00:36 --> 00:01:02
in tight collaboration with the Interaction Design Foundation and top service designers in the field. Twenty years ago, I founded the design consultancy Experience Dynamics, and since then I've collaborated with organizations around the world to train and to create UX and service designs that are used by more than 500 million people worldwide. In this course, I'm going to teach you *everything* I know about how to consistently deliver
00:01:02 --> 00:01:32
great service experiences throughout the entire customer journey. Service Design is about looking at the *big picture*, and that means that no matter what design field you're in, you can learn from Service Design methods. It also means that these methods that you'll learn in this course – no matter if you design websites or government or hospital services, apps, consumer or delivery services, or maybe something completely different – you'll get something out of this course. In the course, you'll learn how to go through a Service Design process,
00:01:32 --> 00:02:01
as well as the practical hands-on methods to use at each step along the way. When you reach the end of the course, you'll be able to run your own Service Design process and you'll know which methods to use to create *measurably better* service experiences. For each method, you'll get a downloadable set of templates that will guide you through the method and how to work with it. And I'll provide you with lots of case studies to learn as you go along the way.
00:02:01 --> 00:02:33
And also there will be interviews from top designers in the field. You'll also learn how to create a Service Design *culture* for your organization and how to set up a Service Design *team*. The course contains both multiple-choice and open-ended questions. And – unlike a lot of other platforms – your open-ended responses are actually graded *personally* by an industry expert. We've also included a practical design project, which you can choose to complete to gain hands-on experience with each and every step of the Service Design process.
00:02:33 --> 00:03:01
You can include this design project in your portfolio to show employers that you're skilled in this technique, for example. At the end of the course, you'll gain an industry-recognized course certificate, which is trusted by leading companies around the world. And it'll make a great addition to your LinkedIn profile and your design portfolio. When you become a member of the Interaction Design Foundation, you can take this course as well as any of the other ones for a *flat-rate* annual membership fee.
00:03:01 --> 00:03:30
In other words, you get a *significant* return on investment and a *lot* of value from the course platform. Speaking of value, if you want to deliver efficient services that deliver value to customers *and* your business, then this is the course for you! In this online course, you'll come away with a lot of practical knowledge and methods no matter if you're new to design or a seasoned designer. And if you're practicing Service Design, you might learn something here, too! I look forward to seeing you on this course!
The demand for professionals with expertise in service design is growing across various industries, from tech to hospitality. In order to stay competitive and satisfy the current demand, many individuals are looking to improve their skills. For those keen on mastering this domain, Interaction Design Foundation's course on Service Design provides an in-depth understanding and hands-on learning. It's a great way to get started or deepen your expertise!
How to prototype in Figma?
To prototype in Figma:
Start by setting up your design frames.
Create your interfaces.
Shift to "Prototype" mode at the top-right and connect design elements to the appropriate frames.
Assign interactions like "On Click" and set actions like "Navigate To."
Use the properties panel to tweak animations and preview your prototype with the play button.
Figma's real-time collaboration feature enhances teamwork and feedback processes.
ShowHide
video transcript
00:00:00 --> 00:00:31
When you're hiring a user experience designer, so a UX designer, as opposed to, a UI designer, are there any hard skills that you would typically look for? - Yes, in the world of interaction design, the primary way you communicate is through interactive prototypes. So, you want to see that people have a
00:00:31 --> 00:01:04
faculty with one or more of the standard prototyping tools like Axure or Balsamiq. You would expect them to know Sketch or OmniGraffle, the Mac World – things like that, and that they can create interactive prototypes because the skill in interaction design is *designing over time*. Sketching skills, storyboarding skills – very important; journey mapping – very important. The specific tool doesn't matter quite as much, because the tools change all the time.
00:01:04 --> 00:01:30
So, you want somebody who can quickly learn new tools. So, if somebody had been working, let's say, in Sketch and Envision and your team is using a different set of tools, it probably doesn't matter that much. But, again, in the portfolio would be artifacts of interactive prototypes and interactive to the level that they could be testable.
00:01:30 --> 00:01:39
So, you have to be able to communicate; if somebody comes in and says, "Well, I build all my prototypes in PowerPoint," you can end the interview.
As highlighted in our video above and reinforced in our article "UX Tools Matter Less Than You Think", while being skilled with tools like Axure, Balsamiq, Sketch is beneficial, the specific UX tool isn't the crux. It's about adaptability and creating interactive, testable prototypes. Read "Best Prototyping Tools" on Interaction Design Foundation for a comprehensive understanding of prototyping.
What are function prototypes?
Function prototypes aren't related to UI/UX design; they belong to the realm of programming. In coding, a function prototype declares a function's name, return type, and parameters without its body. It provides an advanced outline of the function, ensuring correct usage across different parts of a program.
How much does a prototype cost?
The cost of creating a prototype can fluctuate significantly depending on its complexity and fidelity. However, it's essential to remember the value of good design. As noted in our article UX Quotes "The cost of bad design is significantly higher than the cost of good design." Investing in a well-thought-out prototype can save expenses in the long run by preventing costly design errors. While initial costs for prototypes can range from minimal (for low-fidelity sketches) to substantial (for high-fidelity interactive models), the key is to weigh these costs against potential savings from averting poor design decisions later on. Learn how to make the most of prototypes by avoiding these common pitfalls.
What makes a good prototype?
A good prototype helps teams test ideas and is often used in usability tests. In this video, UX designer and author of Build Better Products walks us through the two most common types of design activities teams work on: innovations and incremental improvements.
ShowHide
video transcript
00:00:00 --> 00:00:31
Let's talk about the difference between big, innovative changes to our product and small, incremental improvements, and the kinds of research that you might need in order to make these changes. We'll start with the incremental improvements because that's really the most frequent kinds of changes that we make as designers and researchers. While we all like to talk about designing things from scratch or making huge, sweeping changes,
00:00:31 --> 00:01:00
the vast majority of people spend a lot of their time working on existing products and making them a little bit better every day. So, imagine you're building your new job marketplace to connect job seekers with potential employers. The product works. It's out in the real world being used by folks to find jobs every day. It's great! You made a thing that people are using, for money. Now, your product manager is looking at the metrics and they notice that a bunch of people are signing up and looking at jobs but they're not applying for anything.
00:01:00 --> 00:01:33
Your job is to figure out why. So, what do you do? You can go ahead and pause the video and think about it for a minute if you want. There are a lot of different options you could go with here, but at the very least you're going to want to figure out the following things: Where are people stopping in the process and why are they stopping there? You'll probably want to dig into metrics a bit and figure out if folks do anything besides just look at jobs. Do they fill out their profile? Do they look at job details? Do they click the Apply button? And then do they give up at that point? Or do they never actually even get to that point?
00:01:33 --> 00:02:02
Once you know where they're giving up, you'll probably do some simple observational testing of actual users to see what's happening when they do drop out. You'll probably also want to talk to them about why they're not applying. Maybe you'll find out that they get frustrated because they can't find jobs in their area. Well, that'd be great because that's really easy to fix; if that's the problem, maybe you can try letting them search for jobs near them. That's an *incremental change*. Now, what do we mean by that? It doesn't necessarily mean that it doesn't have a big impact on metrics.
00:02:02 --> 00:02:30
Things like this can be hugely important for your metrics. If you manage to get lots more qualified candidates to apply to jobs, that's a huge win for the employers who are looking for great employees and it doesn't matter that it was just a simple button that you added. But it's not a wildly innovative change. In fact, it's a pretty standard feature on most job boards, and it's a very small improvement in terms of engineering effort, or at least it should be. If it isn't, there may be something wrong with your engineering department... which is a totally different course.
00:02:30 --> 00:03:03
This change is *improving an existing flow*, rather than completely changing how something is done or adding a brand-new feature. OK, now, imagine that you're doing some observational research with your job applicants and you learn that for whatever reason they really don't have very much access to computers or they're not used to typing on a keyboard. This might lead to a very different sort of change than just searching for jobs in their area. Rather than making a small, incremental improvement to a search page, you might have to come up with an entirely different way for candidates to apply for jobs.
00:03:03 --> 00:03:31
Maybe they need to film themselves using their phone cameras. This is a much larger change; it's *less incremental* since you're probably going to have to change or at least add a major feature to the entire job application process. You'll probably have to change how job seekers get reviewed by potential employers as well since they'll be reviewing videos rather than text resumes – which they might not be used to. This is a big change, but it's still incremental because it's not really changing what the product does.
00:03:31 --> 00:04:06
It's just finding a new way to do the thing that it already did. OK, now, let's say that you have the option to do some really deep ethnographic research with some of your potential job applicants. You run some contextual inquiry sessions with them or maybe you run a diary study to understand all of the different jobs that they look at and learn why they are or aren't applying. Maybe in these deeper, more open-ended research sessions, you start to learn that the reason that a lot of potential job applicants drop out is because they just don't have the skills for the necessary jobs.
00:04:06 --> 00:04:30
But what could *you* do about that? Well... our only options are either to find different applicants, find more suitable jobs or create some way to train our users in the skills that they need for the kinds of jobs that are available. All of those are really pretty big, risky ventures, but they just might be what we need to do to get more applicants into jobs. These are very big, and a couple of them are fairly innovative changes.
00:04:30 --> 00:05:05
If the company pivots into, say, trainings and certifications or assessments, that definitely qualifies as innovation, at least for your product, but *how* does the research change for *finding* each of these sorts of things? Couldn't you have found out that applicants aren't qualified with the same types of research that you used to learn that they wanted to search by location? Maybe. Sometimes we find all sorts of things in very lightweight usability-type testing, but *more often* we find bigger, more disruptive things in deeper kinds of research – things like contextual inquiry, diary studies or longer-term relationships that we build with our customers.
00:05:05 --> 00:05:30
Also, bigger, more disruptive changes often require us to do more in-depth research just to make sure that we're going in the right direction because the bigger it is the more risky it is. Let's say we ran some simple usability testing on the application process. That would mean we'd give applicants a task to perform, like find a job and apply to it. What might we learn from that? Well, that's the place where we'd learn if there were any bugs or confusing
00:05:30 --> 00:06:04
parts of the system – basically, *can* somebody apply for a job? It takes more of a real conversation with a real user or a potential user to learn why they're not applying for jobs. It's not that one kind of testing is better than the other; it's that you can learn very different things with the different types of testing. Some types of research tend to deliver more in-depth learnings that can lead to big breakthrough changes, while other types of research tend to lead to smaller, more incremental but still quite useful and impactful changes. Both are extremely useful on agile teams, but you may find that the latter is more common just because many
00:06:04 --> 00:06:15
agile teams don't really know how to schedule those big longer-term types of research studies, while running quick usability testing on existing software is quite easy and can even often be automated.
Usability tests with prototypes help teams test solutions against real user needs and challenges identified through in-depth research like contextual inquiry or diary studies. While major innovative changes can bring significant advancements, even small incremental improvements based on regular feedback and observational testing can lead to substantial impacts.
Prototyping is a powerful tool that helps product teams adapt to evolving user needs, whether by making a system more intuitive or introducing a new feature to address a specific user challenge. Always remember, it's about improving an existing flow, making a product better every day.
What are the three types of prototypes?
The three primary types of prototypes based on fidelity are:
1. Low-Fidelity Prototypes: Simple and often hand-drawn representations, such as sketches or paper interfaces. They're quick to produce and useful for initial concept validations.
2. Mid-Fidelity Prototypes: More detailed than low-fidelity, these often use digital tools and give a clearer understanding of the product's aesthetics and functionality.
3. High-Fidelity Prototypes: Highly detailed and interactive, resembling the final product closely. They're used for advanced user testing and to get a realistic feel of the final design.
The right fidelity level is essential for effective feedback and aligning with the project's stage and goals. For a deeper dive into prototyping and its role in design, read this article and consider enrolling in our comprehensive design thinking course.
Where to learn prototyping?
To thoroughly grasp prototyping, enroll in our Design Thinking - The Ultimate Guide course. This course delves into design thinking methodologies, emphasizing the significance and methods of prototyping. For a deeper dive into understanding user needs to inform your prototypes, also consider our User Research – Methods and Best Practices course. Utilize these resources to excel in prototyping and design.
Earn a Gift, Answer a Short Quiz!
Try Again! IxDF Cheers For You!
0 out of 3 questions answered correctly
Remember, the more you learn about design, the more you make yourself valuable.
Some of the world’s leading brands, such as Apple, Google, Samsung, and General Electric, have rapidly adopted the design thinking approach, and design thinking is being taught at leading universities around the world, including Stanford d.school, Harvard, and MIT. What is design thinking, and why is it so popular and effective?
Design Thinking is not exclusive to designers—all great innovators in literature, art, music, science, engineering and business have practiced it. So, why call it Design Thinking? Well, that’s because design work processes help us systematically extract, teach, learn and apply human-centered techniques to solve problems in a creative and innovative way—in our designs, businesses, countries and lives. And that’s what makes it so special.
The overall goal of this design thinking course is to help you design better products, services, processes, strategies, spaces, architecture, and experiences. Design thinking helps you and your team develop practical and innovative solutions for your problems. It is a human-focused, prototype-driven, innovative design process. Through this course, you will develop a solid understanding of the fundamental phases and methods in design thinking, and you will learn how to implement your newfound knowledge in your professional work life. We will give you lots of examples; we will go into case studies, videos, and other useful material, all of which will help you dive further into design thinking. In fact, this course also includes exclusive video content that we've produced in partnership with design leaders like Alan Dix, William Hudson and Frank Spillers!
This course contains a series of practical exercises that build on one another to create a complete design thinking project. The exercises are optional, but you’ll get invaluable hands-on experience with the methods you encounter in this course if you complete them, because they will teach you to take your first steps as a design thinking practitioner. What’s equally important is you can use your work as a case study for your portfolio to showcase your abilities to future employers! A portfolio is essential if you want to step into or move ahead in a career in the world of human-centered design.
Design thinking methods and strategies belong at every level of the design process. However, design thinking is not an exclusive property of designers—all great innovators in literature, art, music, science, engineering, and business have practiced it. What’s special about design thinking is that designers and designers’ work processes can help us systematically extract, teach, learn, and apply these human-centered techniques in solving problems in a creative and innovative way—in our designs, in our businesses, in our countries, and in our lives.
That means that design thinking is not only for designers but also for creative employees, freelancers, and business leaders. It’s for anyone who seeks to infuse an approach to innovation that is powerful, effective and broadly accessible, one that can be integrated into every level of an organization, product, or service so as to drive new alternatives for businesses and society.
You earn a verifiable and industry-trusted Course Certificate once you complete the course. You can highlight them on your resume, CV, LinkedIn profile or your website.
Design plays a role that’s utterly crucial in our daily lives—it bridges functionality with aesthetics to meet user need
477 shares
10 mths ago
Open Access—Link to us!
We believe in Open Access and the democratization of knowledge. Unfortunately, world-class educational materials such as this page are normally hidden behind paywalls or in expensive textbooks.